1 day guide to Shanghai

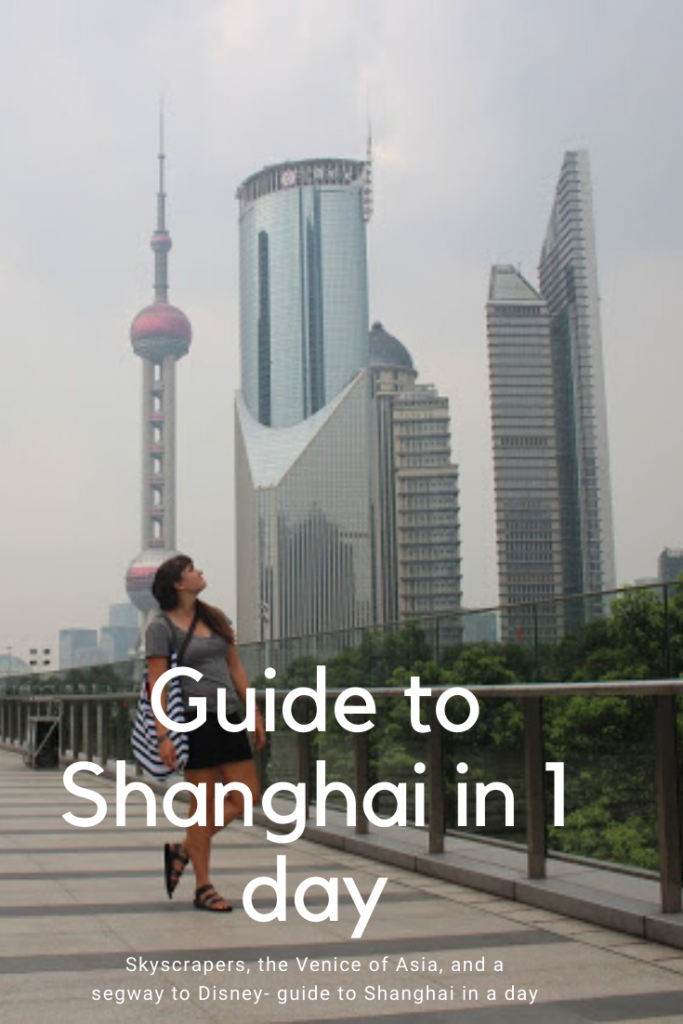
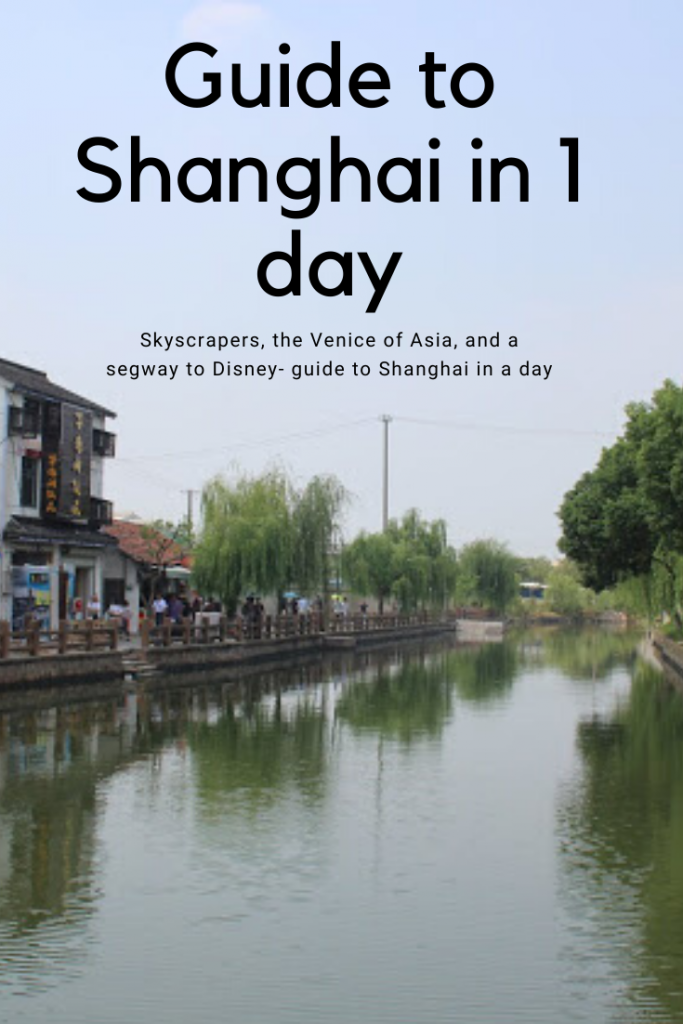
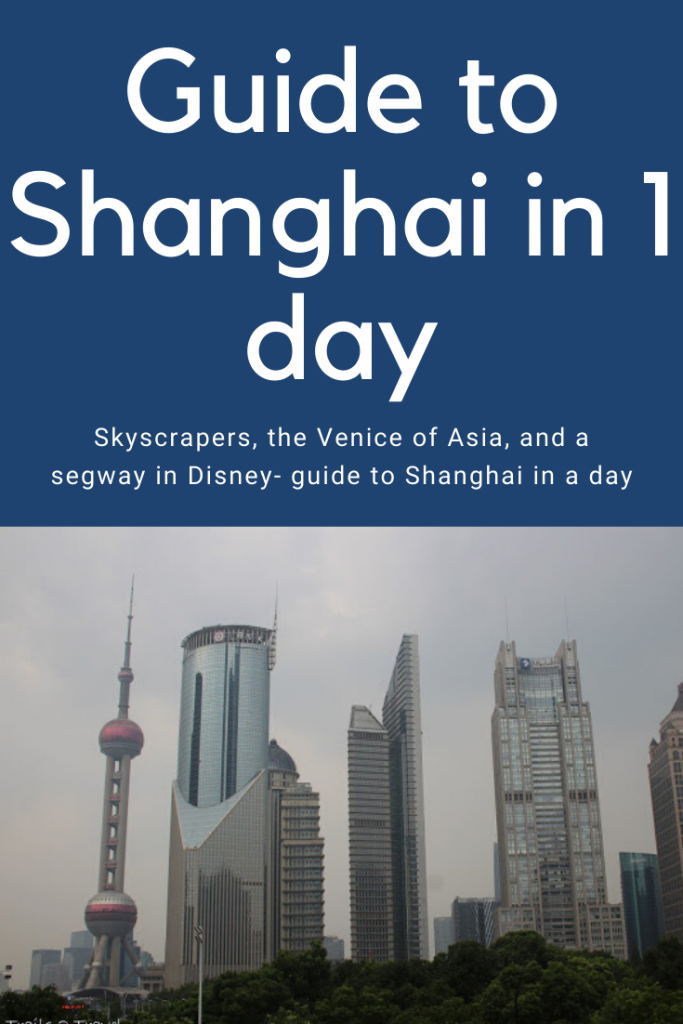
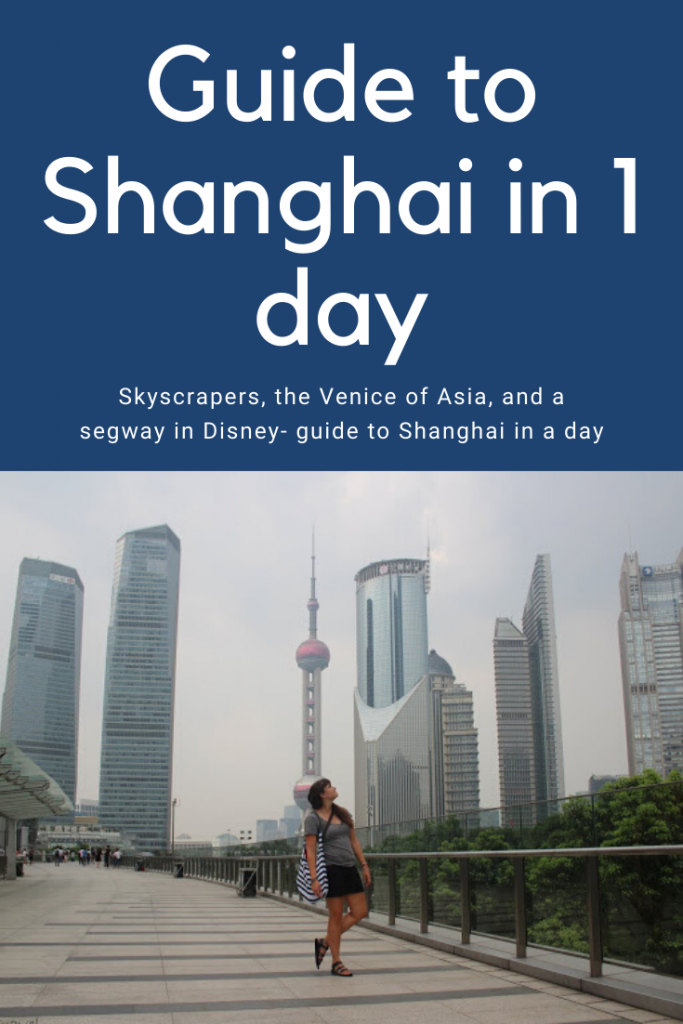
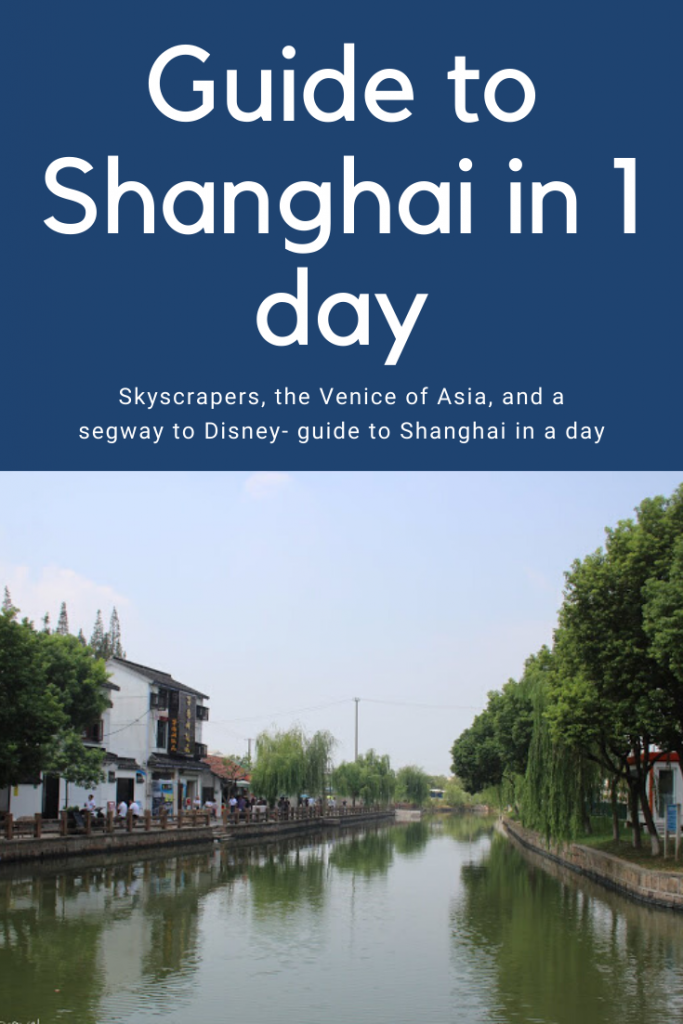
Day 6- Exploring Shanghair from ancient water towns to modern skyscrapers: We wanted to see all we could in a day of what the Shanghai area had to offer. 

The train from Huangshan dropped us off just short of 8AM at the Shanghai station.
*Note there are a few “shanghai” stations as well as airports so it’s important to know which one exactly you will be arriving at. 
 First matter of business was dropping our big packs off at a luggage storage so we wouldn’t have to lug them around all day. We took a random exit from the train station and found one right at the exit. (I think there are multiple) It was about $4/bag/day so we sorted out what we’d need for the next 2 days and said sayonara to our bags. 
Next order of business: Mcdonalds for Breakfast. We went to a very cool underground Mcdonalds… you could say we felt very “hip” going here. Fed and happy we were ready to start exploring. 
So now onto the fun stuff: Zhujiajiao Water Town! Don’t pay $200 for a private tour here, it was super easy to get to! (as easy as any metro goes that is) Unfortunately we were heading out during Shanghai’s morning rush hour, so it took us over 30 minutes to buy our tickets from the kiosks. * TIP: Pay attention down there to the top of the machine and whether you can pay with bills or need coins! 
Tickets in hand, it was easy to follow the metro map, we only had 2 train transfers to worry about, but it still took around 90 minutes of travel to get to the Zhujiajiao station. Then it was another 10-15 minute walk using Google Maps as guidance to the start of the town. 
*The cat statues pictured above signified our turn down to water town. The train station had signs to put you on the major street walking down, but then the signs were all gone and we had to rely on google. 
Beautiful waterway right by the train station 
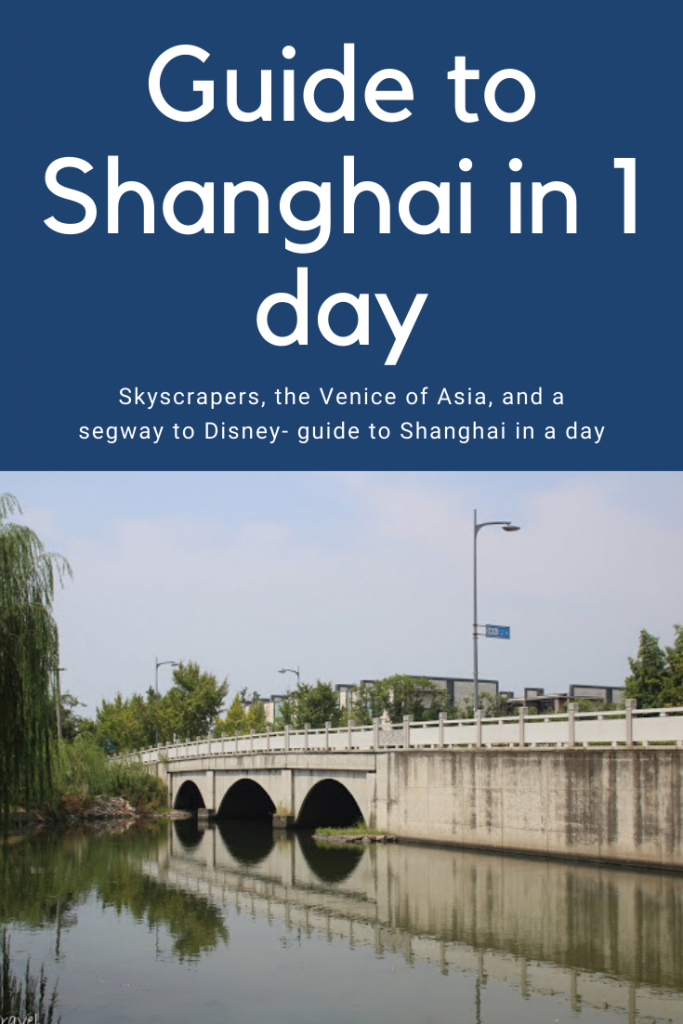
Crossing the giant bridge into the water town 
About Zhujiajiao
Zhujiajiao is a water town on the outskirts of Shanghai, and was established about 1,700 years ago.  There are numerous water pathways (no roads!) and thus many stone bridges: 36 in fact! Each one more beautiful than the next. While we visited for the bridges, other points of interest include:
North Street: the best preserved ancient street with buildings that date back to the Qing Dynasty (1644-1912)
Kezhi Yuan Garden: garden dating back to 1912
Qing Dynasty Post Office: exhibits include old post cards of Shanghai and letters written on bamboo
Fangsheng Bridge: The main bridge coming into the town. It was built in 1812 and is said to be the largest stone arch bridge in Shanghai with five arches, about 230 feet (70 m) long, and 19 feet (5.8 m) tall. 
While maybe not having a ton of other stuff to do activity wise, this little town is one peaceful village. We picked up some beautiful art for souvenirs, had a few drinks/ snacks as we meandered, and watched the little boats go up and down the canals. (We didn’t ourselves take a boat tour this time… it was just too hot, but if interested here’s some info:
Boat Trips/Gondola Rides:
 Each gondola can hold 6 people. There are two kinds of trip – short distance and long distance.
The short distance trip only takes passengers up and down the main canal
price is about 80 yuan/per boat for about 10 minutes.
The Long distance trip goes all over the town and back
Price is 150 yuan/per boat.
Tickets can be bought in the small wooden ticket booths by the docks

Views along the walkway. Some of the bridges are only 1 meter or  under 3,5 feet wide!
If you are interested in visiting the gardens, post office, temples, or other historical buildings there is a small fee. The town/ bridges/ etc are free to enjoy visually but if you want to go in any of the historical buildings, visit the tourist info center for combo tickets. 
Here’s a map of the “attractions” for reference 
Highlights for me: Bridges and Willow Trees 

Roof of the Buddhist Temple. 
Time to head back to Shanghai
A carving we came across at one of the entrance points to the water town 
Waterways you pass walking to and from the train station. The area is pretty scenic all around! 
We headed back to the train/metro station which was a 10 minute walk back, and a short wait and then we were headed back to the city. We got off at the Dongchang Road Station and started exploring the skyscaper financial district. 
. There are 2 buildings you can go to the top of in Shanghai that are popular: the older Shanghai Pearl TV station tower, and the newer Shanghai World Financial Center. The latter was cheaper so that’s the one we chose. We bought our tickets and walked through a short exhibit for the building itself, and the massive growth of Shanghai over the last couple of years. 
Display at the start of World Financial Building tour
Then you hop in the elevator and ride (very quickly) to the 94th floor. Here they have a couple more exhibitist that are part of a different ticket, and you take the escalator up to floor 97. You can peep out the windows here, but the view is much better from the 2nd elevator ride up to the 100th floor so you may as well hold tight.
The building was also currently hosting a Studio Ghibli exhibit and so there were references to the movies in a few places along the normal “100th floor” visit. The exhibits were separate and fairly expensive so we held off on visiting figuring one day, we will visit the main exhibits in Japan/ 
Lots of people at the “very top”
It was crowded and hard to get any decent photos with me in them, but it was cool to look out  at the sprawling expanse of buildings that make up Shanghai. (though I could’ve done without the smog which lowered the visibility somewhat) 
You can see the other popular building, the Pearl TV tower in the background
After gawking at the view for a little while, we made the journey back down and found a pizza place in the restaurant/mall portion of the building for a lunch/dinner
More Studio Ghibli exhibit references on the escalator 
After eating our fill, we headed out to continue our trek through the financial district to the river where our next stop was: The Bund. We walked to the Lujiazui station to ride one stop to the East Nanjing Road station. Since the Huangpu river is so wide, there aren’t any bridges in downtown! And so the only way to cross the river is via metro in a tunnel! 
Amazing buildings we passed on our walk to the station 
From the East Nanjing station it was a short 5-10 minute walk through shopping areas to the Bund photo area. 
Made it!
From here we got to admire the buildings we’d just come from (and visited the top of!) which was very cool. We’d considered doing a night cruise on the Huangpu river (which is generally considered a MUST DO) but we had a decent trek out of the city for our hotel that night so we called it a day around 6:30 and headed on our way… 

Lots of people and other cool buildings at the Bund 
Panorama  
Heading back to the station
Unfortunately we were headed to our hotel… in the MIDDLE OF RUSH HOUR. 
Never before have I stood so close to other humans, or narrowly avoided being guillotined by subway doors. We had 2 connections we had to make and at both of them we had to wait for 2 trains before we could squeeze our way on. That being said, it did finally start to empty out after we cleared the main city center. We even ran into an end station for one line where everyone got off but us and we sat there like confused idiots when the train returned to the station we had been at prior. *facepalm BUT the next time we realized in order to continue on our line we had to GET OFF the train and cross the platform. Oh boy. Other than that, painless to take the metro all the way out to Disneyland Shanghai. 
Once there, we walked out into the dark and after a little walking we found a lot of cars lined up that were essentially like uber taxi drivers. Our hotel was only 3 km for Disney but we didn’t want to chance walking in the dark so we paid a couple bucks to have a drive take us. Our hotel was sort of a converted house into a B&B and when we got there, no lights were on and there were several buildings to choose from. Our taxi driver looked at us like we were crazy when we got out… and we thought we were too. (seeing as there was literally a dude bathing outside at one of the buildings, and dogs barking at us everywhere)
Eventually after e-mailing and calling the property (about 10 minutes) the hotel owners came out to guide us in. And everything was peachy from there! We settled into our little room and prepped for our next Disney adventure exhausted but satisfied with everything we saw in one day. 
Day 6 costs:
Breakfast $6.63
Luggage check for the day $8.74
Metro to water town $2.33
Water town souvenirs/ drinks $30.61
Metro back to city $2.33
Top of the Shanghai Financial Center $46.64
Lunch/Dinner $26.23
Metro to Bund $0.85
Mcdonalds treats $3.65
Metro to Disney $1.45
Taxi to hotel $4.35
Hotel: Hua’s Cottage $45
Day 6 Total: $178.81 for 2 people

Explore Historic Helper

My last Carbon County post: last but not least as the little town of Helper is up there on one of my favorite parts of the area. If you like small towns with artsy vibes, historic buildings, amazing locals, and delicious food, this town is for you! 

After my short off-roading/ hiking adventure around the Pinnacle Peak area in the morning, I regrouped with Katie and my favorite tour guide/ new friend Tina. We met up just off hwy 6 at the Big John statue which starts the historic town’s main street. After all the history and stories we’d been hearing about coal mining in the area that weekend, it was cool to see the spirit of the coal industry embodies in this statue
Big John is a must see as he really embodies the heart and soul of Carbon County which got its start with railroads and coal mining. Big John was crafted in CA and arrived at his permanent home of Helper in 1964 alongside the railroad/mining museum. He was named after the hit  1961 song “Big Bad John” as no other name really fits this 20 foot tall miner. 
Next up we headed down the street a little ways to the new Harley Davidson museum that is being built (and almost finished) It was beautifully done with a variety of bikes and other HD memorabilia. We just had a quick look around at the work in progress but I’ll definitely have to come back when it’s all finished up.
Helper Points of Interest 
The Western Mining and Railroad Museum
Next door: The mining equipment and museum yard 
Balance Rock: A little too strenuous of a hike to attempt on any given day but easily seen from the town’s main street when just looking to the north
Big John statue
Spring Canyon: An easy walk where you can see the remains of coal camps that helped form the foundation of Helper 
The front entrance to the Harley Davidson museum 
A Short History of Helper 
Helper was first settled in 1881 by Teancum Pratt and his wives and was followed closely by the railroad only 6 months later. Helper was then named after the team of “helper” coal-powered steam engines that assisted freight trains up the neighboring Price canyon (a 15 mile long climb with a 2.4% grade) to Soldier’s Summit. With the railroad came the need for coal and thus the need for man power and immigrants. In 1900 Helper’s population reached 385 people made up of at least 16 different nationalities and after coal worker strikes in neighboring mines like Castle Gate, the population grew to 850 between 1912-13. Helper essentially became a “hub” with multiple businesses surrounded by several coal mining operations. Even with the Great Depression, the town’s position as a railroad center provided stability and through WWII the town had additional stability provided by the increased demand for coal. Now, even though the need for coal from the mines has declined (the actual Carbon power plant was closed just in 2015 after 60 years of running), the town survives and has become a center for art with several galleries lining its main street. The main street also plays host to a summer art and music festival, monthly markets called “first Fridays” and soon its own film festival
A short ways down the street we passed a fun “alchemy” art studio that had chalk out front so you can grace the sidewalk with your own art. There were lots of beautiful art studios along the street that worth are window shopping and peeping in. 
I loved all the fun artsy elements of main street Helper. 
Continuing on you pass loads more old buildings that all have descriptions of what they were when first constructed as well as a sign leading to what will be a nice waterway beach spot for playing during the warmer months
And then you come to the museum yard with old mining and railroad equipment. 
While you can’t climb up ON the equipment, a lot of the pieces were interesting to learn about and make fun photo props. Right next door is the Western Railroad and Mining Museum which is certainly called for (when it’s open) We unfortunately hit a Monday which during winter hours, it’s closed on. 

There were lots of beautiful old buildings to enjoy
The historic street is framed by 2 made over Conoco gas stations that again are fun to walk around for photos and admire that Cars land vibe. 

 After the gas station we turned and headed back down main street. 
I love how nestled it is among those desert cliffs. 
 After window shopping more art galleries, adding some sidewalk art, and all that walking, we worked up an appetite and obviously had to get lunch in the Balance Rock Diner. (review in my where to eat post here
And after lunch, we hit up the coffee shop across the street Happiness Within for some caffeine before our drive back to Utah County thus concluding a wonderfully relaxing afternoon stroll along the historic Helper thoroughfare. 

So whether passing through or looking for a close by weekend getaway, I definitely recommend stopping in Carbon County for museums, playing in the wonderfully diverse outdoor landscapes, gawking at ancient American rock art, and eating! 
Katie and I with our Happiness Within Helper hats (and not shown here: Balance Rock Diner t-shirts) and definitely Helper fan girls now. I can’t wait to come back and explore more of this area. 

Where to eat and sleep in Carbon County

First and foremost: Let’s start with the food 
GROGGS Pinnacle Brewing Co.
 Our first night in town we headed to the local brewery/ pub (because after ATVing all day, that seemed the natural progression). GROGGS while sounding medieval, turned out to be quite delicious. They had decent prices, and fantastic food. I got my usual bacon cheese burger (which I would put on top 10 burgers ever) and Katie’s in-house smoked prime rib sandwich looked pretty fantastic as well. This place is open 7 days a week (though closes at 8 on Sunday) so if you’re looking for a place to eat, particularly on Sunday, I recommend.

Tangerine Eatery
 If you’re looking for grub on a Sunday, again options are limited but one of those options includes the Tangerine Eatery. FanTASTIC sandwiches at a decent price. I got the Chicken Bacon Avocado sandwich that has a unique pesto aioli on it and plenty of the good stuff. Add a soup for only $1. 
*Skip the frozen yogurt here and get some ice cream from downtown helper. I’m usually a big froyo fan but none of the flavors were creamy or really stuck out to me. 
Udderly Ice Cream
Set on adorable Helper main street in the old Emporium building this ice cream shop serves up delicious Leatherby creamery options in a vintage ice cream setting. *ALSO OPEN SUNDAY! 
Family Fave: Balance Rock Eatery & Pub
Historic pub located on main street in Helper, the menu has it all. Breakfast served all day, sandwiches, burgers, salads, you name it. The portions are giant and prices reasonable, making this a stop I’d hit every time I pass through Helper. I loved the historic building, the incredibly- friendly service, and don’t get me started on the food. 
I got a bacon and cheese sandwich (wow… I stick with a status quo don’t I?) that was basically an entire chicken breast, amazing bacon, and a ton of cheese. It was SOOO good. Also try their in house made “rock chips” which have a light BBQ seasoning on them and there perfect crisp to pair. 
My #1 favorite eating spot in Carbon County. 
Happiness Within Coffee shop
If you aren’t hungry when passing through or don’t have time for a meal, then check out Happiness within for your caffeine fix. I loved the ambiance of the interior with exposed brick and art to gawk at. They had a nice range of offerings and I especially loved their October specials. Again small town friendliness adds to the appeal. 

Unfortunately that’s all we got to try that weekend but other honorable mentions based on local recommendations include:
1. Greek Streak for your Mediterranean craving
2. Los 2 Amigos
3. Sherald’s Drive in

Where to Sleep 
We stayed in the luxurious Holiday Inn Express that’s a mere 4 years old, has super comfortable beds, and a crazy good breakfast so as far as hotels go… that’s my top recommendation. BUT if you’re feeling adventurous, here’s a few of my favorites to check out. 
Nine Mile Ranch Bunk and Breakfast
$80-$95/ night for hotel room
$60-$95 for cabins *pet friendly 
Campfire songs, cowboy poetry and Dutch oven cooking are all part what make the Nine Mile Ranch bunk ‘n breakfast unique. Situated in the mouth of historic Nine Mile Canyon, “the ranch is a perfect place to get away from the busy world,” explained owner Myrna Mead. The location has camping, rooms, and even a Teepee with an all you can eat breakfast and dutch oven dinners. They offer tours, horse back riding and on foot. 
Next time I come down, I’m probably going to check this place out. 

Historic Knight’s Landing Apartment on Helper Main Street $99/night
Sleeps 4, book through AirBnb
Upscale apartment located in a historic 1918 building on Helper’s main street. Within walking distance to the local, market, two restaurants, art galleries, museum, the river walkway and everything else Helper’s historic main street has to offer.
Historic Helper House $96/night
Sleeps 4, book through AirBnb
Helper House is a cozy, single level home located on Helper’s Historic Main Street. Located close to the River Walkway, this charming house is in an ideal location for all of your explorations in Central Utah. Across the street is our famous “Big John”, Utah’s tallest coal miner, and less than 10 miles away is the USU Eastern Prehistoric Museum. You also will have a front row seat for the annual Helper Arts Festival and Utah’s Christmas Town’s Main Street Light Parade.

Artist’s River House $115/night
Sleeps 4, book through AirBnb
100 year old family home, restored with modern aesthetic yet maintaining original charm. King bed in bedroom with fold-down couch in living room and floor space for air mattress.
One block from historic downtown Helper with easy access to two diners, western mining and railroad museum, artist studios and antique shops.

2 Bedroom House $59/night
Sleeps 6, book through AirBnb
Entire upstairs of a house with Stylish decor – stainless appliances, warm blue interior paint, laminate flooring, & full tile shower with glass surround. An affordable place for a whole family.

Airbnb Guest Suite $35/night
Sleeps up to 5 guests, book through AirBnb
A 375sq ft space with a private secure entrance and private bathroom. There are no shared spaces. There’s a king size bed, sleeper sofa, and space for additional travellers! Perfect for budget minded travelers looking for a clean, safe and cozy space. Enjoy WiFi and Netflix.

Desert Thunder Stock Car Races

Another Carbon County Success story: Getting to watch closing races of a 3 day event: The Castle Country Clash at the Desert Thunder raceway. Some of you who knew me years ago would know I was a big NASCAR fan back in the day. (I mean I made NASCAR board game for a 5th grade math project once…I was serious about it) 
So when Tina asked us if we would be interested in attending the weekend’s stock car races my answer was an easy YES! Saturday with our ATV ride, we were wiped out but luckily we finished our hike Sunday just in time for me to check out the afternoon races. 

The raceway is maybe a 5 minute drive from the highway in Price but feels completely out there in the desert. Tons of free parking and the entry booth exchanges your ticket for a raffle ticket at the start. There’s just a few buildings for concessions, announcers, and porter potties. LUXURY. 
Luckily I wasn’t there for comfort, I was there to see some racing! 

Concessions were decently priced and provided by the town’s historic Frosty Freeze (drive up). Everything looked pretty delicious I have to say!
My impression of the stands was awesome, while you can’t bring any food/ drink in you CAN bring a camp chair, blankets and the like. The main stands are actually giant concrete steps so you set you camp chairs up on that (or just recline/ spread out on one like I did) They did have bleachers around 3/4s of the track as well. 
Make sure to bring with you to ANY race: SUNGLASSES, SUNSCREEN ( I was really getting toasted), and if you attend a legit NASCAR race, hearing protection isn’t a bad idea.
*The cars were loud here, but not too bad. I could shout at the person next to me and somewhat hear their reply. 
A short history on Stock Car Racing:
It was born in the Southern Appalachians as people had a need to transport loads of illegal moonshine while evading the revenue agents. The 1934 Fords would get decked out/ modified and driven on twisting dirt roads in the dark, often exceeding 120 miles/hour. It became a popular event to find out who had the fastest car which lead to weekend races on make shift dirt tracks. From this start, NASCAR ( one of the most popular forms of Stock car racing) was born in 1948. Other forms of Stock Car governing bodies also started budding up. Dirt Track racing such as the Desert Thunder Raceway. have a more decentralized way of governing. There are some National boards for dirt track racing, but most are regional.
“Before there was a need for speed, there was a need for shine.”
~ Compliments of the NASCAR Hall of Fame. 
NASCAR/ STOCK CAR Racing Fun facts:
1. Today stock car racing is the second (arguably almost first) largest spectator sport in America, drawing ten million fans annually
2. Nearly all tracks are oval and less than 1-mile (1.6 km) in length (not withstanding tracks like the Daytona 500 which are 2.5 miles around)
3. Drivers do not typically need to wear diapers, regardless that their races last half a day sometimes.
4. During NASCAR races, the temperature in the car often exceeds 100 degrees, reaching as much as 170 degrees by the floorboards. Thus during a NASCAR 200 lap race, drivers can lose 5-10 lbs merely through sweat.
5. The first lady of Racing title goes to Louise Smith who secretly entered a 1947 race using her husband’s Ford Coupe. She raced until 1956 and won 38 races in various divisions.
6. Dirt tracks are much less difficult on tires allowing drivers to go several races without having to replace them. An asphalt track however will require at least one full tire change and many more in
a complete 500 lap NASCAR race.
7. Races can be anywhere from 20 laps to 200 lasting a mere 15 minutes to hours on end depending on how many cautions/ what kind of cautions are thrown.
8. At 200mph a Nascar goes the length of a football field in a second.
9. The top 5 NASCAR racing venues all have a bigger capacity than the biggest soccer stadium in the world. ** my favorite fun fact.. take that Soccer
   

The race I got to see had several divisions going on and I got to watch 5/7 of them. The one most of these photos is from is the hobby stock car division which had the MOST number of cars out of any of the races, ran a full 40 laps, and had the most wrecks. (At least 6 cars were towed out before the race was over) The other divisions included: Modified, Sport Modified, Classic Stock, Hobby, and my personal favorite: Dwarf. (bottom photo on this post has them identified in a photo) 
The video below shows 1 lap after the cars were coming out of a few caution laps (following a wreck) as they are just getting to take off and start racing again. 
Stock Car Racing for Dummies… At least know the flags:
1. Green Flag- Used to start the race and indicate when drivers can race again after a caution
2. Yellow Flag- Caution, used when unsafe conditions are on the race track: usually debris from crashes
3. Red Flag- Rarely used but potential in inclement weather or completely blocked tracks. Flag indicates to pull off into designated areas
4. Black Flag- Used for specific drivers to indicate they need a pit stop (leaking fluid or loose body work) or that they have disobeyed a rule
5. Black flag with white cross- Used if a driver ignores the black flag for more than one lap and indicates they can no longer be scored.
6. White Flag- indicates one lap left
7. The chequered flag- indicates the race is finished

While there are dirt track races and sophisticated NASCAR races happening all year round, every weekend, the Desert Thunder Racetrack only hosted 4 major events in 2018so it was perfect timing for me to check out the closing race of the year. 
Cost for the day is only $8 an adult, $6 for kids, with 5 and under being free. There’s also family passes for 2 nights around $25. 
Check here for the race track’s facebook page to follow along if interested in attending the next event. ( I know I am) Sunday races aren’t the norm down here so it wasn’t nearly as busy (which I liked) but if you come down for a Friday or Saturday event, make sure to come early to get a good spot. I heard the night time races were PACKED. 
Pano of the race track that is 3/8 mile long by 80 feet wide (the longest dirt track west of Denver)
The winners came out at the end of the race along with a few from the last race that just hung around. 
All of the events and divisions were fun to watch with lengths ranging from 20-40 laps. The Dwarf and Hobby were my favorite, but all cars have special techniques to racing that is just captivating to watch, particularly on a crazy dirt track like this one. 

Trail Guide- Gordon Greek Waterfall

Everyone knows I can’t go on a vacation without checking out at least one hike and in this case, the Gordon Creek waterfall was calling my name. 

Trail Stats:
Distance: 2.5 miles RT if you go all the way to the top of the falls
Elevation gain: 250 feet (there’s one decent up and one down each direction)
Kid friendly, dog friendly, ATV friendly. 

Driving Directions: 
Don’t over complicate this. Go ahead and plug Gordon Creek TH into google maps, it has the right location. It will take you from from HWY 191 onto Consumer’s Road and this is where it might get tricky. Google tried to convince us we needed to go through a coal weigh station but the truth is (while you can go that way when the gate is open) you want the left turn just before the plant. After a 50-100 feet you’ll cross a cattle guard and continue on this road until it merges with Trestle Road. From here google maps works like charm. The trailhead will be about 3.5 miles from where you turned off Consumer’s road and the gravel road is well graded with no pot holes (so family vehicle safe!) When you reach the trail head sign, park anywhere and follow the ATV road for the hike!

The ATV road/ trail is just to my right, follow it all the way to the falls!

 One short downhill section and you’ll be in my favorite area. Around the bend you’ll cross a small stream and head up a hill.

 Not too long after that you’ll be able to see the falls. We first headed to the top of the falls and then came back to that plateau to enjoy the view in front.

 Looking out across the top of the waterfall

 Trying not to slip

 Lots of places to sit, dip your feet if it’s a hot day, and a cool area to explore around the top of the falls… just take care not to slip.

 We wandered over to the plateau for a better look at the canyon that Gordon Creek flows through

 Not to mention the falls themselves

We had some time to kill so we spent about an hour sitting here with this view, enjoying some drinks and talking about life. We saw one other small family that shortly visited the falls before continuing back up the trail.. so all in all we had the area to ourselves! 

 As there was no one to take our photo… this was the best we could get with a giant pile of rocks and a phone on selfie timer haha

The trail will maybe take you 30 minutes each way. So the main time decision is how much time you’ll spend at the falls. Keep in mind that there’s no services anywhere along the road or at the trail head… so if you have 1 too many coffees at breakfast, or drinks during your life chat, plan accordingly.
AND PLEASE PACK OUT YOUR TRASH. 

After vising the falls, it’s an easy little drive on the trestle road just past the parking area to see the trestle bridge that crosses over Gordon Creek. (you could see it for a half a minute hiking back from the waterfall from afar)
The Gordon Creek Trestle bridge was built in 1912 and serviced the Mohrland Branch of the Utah line for almost 100 years. It saw it’s last train crossing 6 years ago, and unfortunately, part of the rail deck was burned and damaged so the bridge (in its current state) is not longer safe for use.

Map of the trail. The yellow dot is the trail head. The shorter detour pointing down is the road to the trestle bridge if you’d like to visit. (It’s definitely a cool checkout if you’re interested in trains, history, bridges, or all of the above!) 
**Bonus: If you have an ATV or bucket loads of time to explore, there is a cabin that is another couple miles (2-3) past the waterfall, and a SECOND LARGER waterfall another 3-4 miles past the main one. (So if you want to do all of that, you should plan on at least 8 miles RT, possibly 10 but seemed worth checking out.) Supposedly the ATV road goes almost up to the 2nd falls so if you have one of those, it would be a great place to explore! Enjoy! 

Fall Carbon County ATV ride

Fall Carbon County ATV Tour

Let me start off this post by saying that not only did this tour far exceed my expectations, but the entire area did. If you hear Carbon County, most people immediately ask “what is there to even do there,” “where is that?” Then you mention “Price” which is on all the road signs when you head from SLC to Moab and you get a few nods. 
WELL, time to change that.

I cannot believe I have lived so close (less than 1.5 hours!!) from such a beautiful place! Our tour was organized as part of the 
FIRST ANNUAL CARBON COUNTY FALL JAMBOREE

ABOUT THE EXPERIENCE:
The tour includes both breakfast before the ride, and lunch halfway through, organized leaders who will make sure you stay on the right path/ don’t get too separated from the group, and are ok in case of emergency. Not too mention you are guided with some of the best HISTORY experts on the area. We learned so much about the history of coal mining in the area! And did I mention the cost of this was $25 for first person on a vehicle, and only $10 for passengers?! 
**You do need your own or rent and haul in an ATV/ 4-wheeler/ QUAD/ whatever you want to call it

The tour was a full 8 hours and went up above 10,000 feet at Bruins Point passing old coal mine construction (more on that below) and incredible fall colors. Then it descended down Dry Canyon  to 9-mile canyon (basically the red rock desert we all know and love) before climbing up Cottonwood Canyon to alpine plateaus with WILD HORSES and back down to the starting point. Basically THIS. PLACE. HAS. IT. ALL.

Map of the route we took.

We met at 8 for what has to be the best breakfast I’ve ever heard of : Breakfast Pizza! with coffee and orange juice. We picked up our swag bags which included genius buffs (but bring your own just in case!) as well as a map of the roads we’d be taking, an awesome Carbon County Patch, water bottle, and more info on the area. We had a brief safety debriefing/ information meeting with the leaders of the group and then loaded up.

THERE WERE 37 MACHINES/ &70 PEOPLE
It was awesome! I’ve never experience what it is like to ride in a biker gang, but I’m pretty sure it was similar to this. Everyone lined up, flags flying, ready to ride on a beautiful fall morning. 

Oar Buckets on the 3.5 mile long cable way 

We rode a ways up admiring the fall colors that were changing, some old ruins of homes (from the early 1900s) as well as gawking at still standing, original and unaltered, oar buckets on a cable line. The towers supporting the cables were all still standing, and by all appearances untouched by time.

Half way up the mountain, we stopped to keep the group together, admire a tower up close, and get a little history lesson. The cable line that ran between the towers was constructed in the 1920s and ran 3.5 miles each way, making the line a total of 7 miles altogether. At the time, this was the longest continuous cable in the US. 

MORE ABOUT THE SUNNYSIDE COAL MINE 
1. Coal mining in the area got its start in the area in 1883 with the introduction of the Denver and Rio Grande Western Railroad company that needed coal for the trains.
2. Sunnyside started out as Whitmore Coal (in Whitmore canyon) in 1896.
3. The coal mined in the area was of good “coking” quality which means it was excellent for making steel. (by baking the coal in giant ovens, it forced out impurities leaving mostly Carbon behind) Giant coke ovens (650 of them) were created in the area to easily coke the coal before shipping it to areas in the Western US.
4. By 1909, the sunnyside mine was mining 3000 tons of coal/day and by 1914, furnishing nearly 300,000 tons of coke coal per day.
5. Unfortunately the the railroad and copper smelters that were the primary customers of the coke were switching to use of coal directly which made the Sunnyside mine less useful in the 1920s-30s. Luckily though, in 1942, Geneva Steel in Utah valley, and a steel manufacturer in California found plenty of use.
6. With the exception of the war years however, demand for coke was dropping off so the mine struggled. The ovens themselves operated until 1958 when they closed as well.  

 Pretty fall colors as far as the eye could see

We stopped once more to see the tower where the cable originates before really stopping at the summit, Bruins Point. Here we took a slightly longer break for bathrooms (in the woods, no toilet here) and views of the fall colors surrounding.

 
Katie and I on the summit!

Then back on our respective rides to drive a longer ways down into the desert?! All the sudden it went from fall woods, to red rock canyons.

 TIPS TO HAVE THE BEST ATV ADVENTURE:
1. Wear layers! In the morning shade it was very chilly and at the top of the mountain all day it was windy and cold! Make sure you have a warm jacket/coat, and maybe a blanket to cover your legs!
2. On that same note, bring a good thermos to keep your hot drinks warm in the morning
3. IT WILL BE DUSTY. Don’t wear your Sunday best, make sure to wear sun glasses/ goggles, and have a buff or scarf to cover your nose and mouth when it gets real dusty.
4. Also on that note, bring some nice wet wipes or baby wipes to periodically clean the dust from your face and hands. It makes a huge difference.
5. Bring a map of the area! We were in a tour led group, but there were diverting roads and paths that without a leader or a map could get tricky!
6. MAKE SURE YOU HAVE ENOUGH GAS FOR YOUR JOURNEY
7. Bring a speaker for music, cool drinks for when it gets hots, and have a blast!

 Stopping for another short re-group break. Amazing turn out for a first annual event!

 Driving through what felt like the Grand Canyon!

Before I knew it, we were admiring our first look at the Indian rock art in the area (which hardly anyone gets to see as we had not yet made it to 9 mile canyon)

See the rock art?

A short time later we were at our lunch stop in the Daddy Canyon Complex where a pit toilet was available, short hiking trails, and picnic tables were located.

We had our packed lunches (good sandwich, apple, bag of chips, and small dessert) along with our chilled beverages from the cooler, and then went exploring during our 1 hour break. We walked back in along the canyon admiring so many more petroglyphs!

Taking my best guess at what some of the art means! 

Taking a lunch break to go for a walk in the desert

ABOUT 9-MILE CANYON & THE ROCK ART 
1. Wondering how 9-mile got it’s name? There’s a few stories out there, but the most likely comes down to when John Wesley Powell (ring a bell?) was exploring the Green River in 1869 ad used a nine mile transect for mapping the canyon.
2. 9-Mile Canyon was inhabited by native peoples for over 8,000 years with the most prolific artists of the area hailing from the Fremont people who lived in the area from 1100-1200 AD.
3. The canyon is often referred to as “The Longest Art Gallery in the World
as the entire canyon has amazing wall art in abundance.
3. Main points of interest include: An original homestead cabin at the cottonwood Glen Picnic Area, a Granary (ancient building walls) as well as a pit house, and tons of rock art. The most popular sites there are located around Balanced Rock and the Great Hunt Panel.

We had one more stop along 9-mile canyon to see the giant art of “The Great Hunt Panel.” A stop definitely worth checking out! In fact look around the corner to see a buffalo!

At this stop we were about half way through our tour and one of my new friends from the group, Boyd, offered me the chance to drive his side by side Polaris! Um YES! I was thrilled, so this backseat bystander transformed into a Motocross racer on a Side by Side. 

We turned up Cottonwood Canyon which while still being mostly red rock, seemed a different sort of dessert and transformed into more open high alpine plateaus. It was up here that we were treated with the icing on the cake so to speak:
WILD HORSES

 I’d always heard Utah was home to some wild horses, but had yet to see them with my own eyes. We started off spotting only 2 or 3 here and there before coming across the rest of the herd of around 20 horses, that all started running by.

At this point, my day couldn’t get much better but I guess I’d been impressing my ATV companion (with either my driving skills or chatting abilities.. I’m still not sure) and I was allowed to continue on driving. Needless to say, I’ve got a great new friend(s) from this experience!

Cottonwood Canyon eventually connected us back up to Bruins Point and we headed back down Spring Canyon past the old Oar buckets and finished where we’d started at Sunnyside park. 
A whole lot dustier than we started, but grins on our faces that couldn’t be wiped off. 

This was just the start of my discovery in Carbon County. More posts to come on hikes, historic towns, more ATV trails, and NBD: Stock Car Races. Stay tuned. 
**Sorry for the China post interruption, wanted to get this info out while there was still time left in the Fall season to enjoy!

I lucked out with amazing friends with ATV’s but if you have neither the ATV or connections, here’s a few spots you can rent one from. (Keep in mind you need to be able to transport the ATV from Spanish Fork to East Carbon, about 50 miles as there is currently no rental spot in Carbon County.)

1. TRAX® PowerSports of Provo: 801-613-8729

  • ATV (can fit 2 people) will run you $156-$195 per day depending on length of rental 
  • Side by side (2 people) is $196-$245 per day 
  • Side by side (4 people) is $220-$295 per day depending on model and length of rental
2. Summit Motorsports in Spanish Fork:801-405-7433 
  • Call for prices 
3. Toyitup Rentals in Spanish Fork: (801) 489-8697 
  • Call for prices 

Guide to Mount Huanghan- The Western slopes and Guest Greeting Pine

Day 5- our 2nd day on the mountain. We were both kind of waking up around 5:30 and noticed lights of people/ groups out hiking to a peak to watch sunrise. We both had rough sleeping, but felt good enough at least so we got dressed, gathered our small pack of things, and headed out to check out sunrise. In the interest of not getting up early enough and being hungry for breakfast, we only did the short walk back to the cloud dispelling pavilion where we’d watched the sunset. I wish however that we had just done the jaunt up to Purple Cloud Peak as that was probably the best/ closest peak to our hotel and was tall enough we would’ve been able to see the East side of the mountain.
 

Ah well, still not a bad view from the pavilion.
We hung around for 10-15 minutes as the sun was already almost up when we got there. The views and affects were similar to the night before… no morning clouds/ fog for us. Then we checked out of our hotel and grabbed breakfast around 6:15 (narrowly avoiding the rush) and I will say breakfast was decent. They had a large array of food, I mostly stuck with rice porridge, rolls, hard boiled eggs, and a ton of fruit. But they had lots of “noodle” options and even toast. They also had an intriguing “orange juice” that was basically orange fanta made from boiled water. So it was hot. Haha at least we knew it was safe.
Then we were headed out onto new terrain. We backtracked to complete the loop in the center and take the path b Xihai hotel up to Bright top. There were a few “hotel” paths that looked like they may be the one we wanted but had no signs so that confused us but eventually we found the sign and trail split we were looking for (further East of the hotels). In other words, if there isn’t a sign, it isn’t the path. Hahaha!
 
Morning light filtering through all the pines. We really hoped we’d spot a monkey, but alas… we did not.
It was a pretty strenuous up hill walk to Bright Top with stairs continuing forever. It took us at least 30 minutes and we were definitely over it. While the trees were pretty, there wasn’t much of a view and thus I deem this path not really worth doing.
Beautiful reservoirs of water that act as holding tanks on the mountain. While the area gets a decent amount of precipitation, it definitely still needs plenty of water to support all the visitors and hotels!
Made it to Bright Top (view again looking toward the Western Sea)
 
Trail Stats from Paiyunlou Hotel to the Mercy Light Pavilion (bottom of the Western Steps)
Distance: 8.3 miles
Elevation Gain:1,300 feet
Elevation loss: 3500 feet
Estimated time: 4-6 hours
*These figures are based on maps I saw with distances and elevations of the points of interest called out and are rough estimations.
Points of Interest: Turtle Peak (separate trail), Lotus Peak (closed to peak bagging but you can see it), Celestial Capitol Peak, and the Guest Greeting Pine .
 
Peaceful morning on the trail
Looking up at Bright Top, the main focal point of the mountain by diving it into quarters
On Bright Top looking over at Turtle Peak (a great sunset/sunrise spot if staying at the Baiyun hotel)
Clouds way in the distance
Once at Bright Top, it was easy to continue following the signs for the “Yuping scenic area, otherwise known as the “western steps” and the path we planned to take down off the mountain. This side was pretty unique with the granite tops being more rounded and boulder-y looking than the peaks on the Eastern steps.
We were glad we started early!
The craziest part of this mountain were the numerous porters offering their services to carry people. And there were.. several people that we passed taking them up on that. (this lady we are pretty sure was carried all the way from the Baiyun hotel area to the top of the Yuping cable car. 
Prices for reference! Only $15 to be carried 2 km! (one of the more flat paths I suppose) .. but like what?!
While I couldn’t myself pay someone to carry me, I don’t blame some of the older folks as this side of the mountain was a LOT of up and down. One part was the steepest set of stairs we came across on the mountain (maybe ever), “the ladder to heaven” and unfortunately we had to go up it.
Our first view of the incredible Celestial Capital Peak.
We walked for probably another hour-1.5 hours before we started seeing the crowds from the Yuping cable car (getting to the area then right around 8:30 or so)
You can see the Yuping cable car far down below it. (those were also already very high for reference)
A cool part of the trail walking under some boulders.
My favorite! Pine trees!
And then we hit the crowds full stride close to the Guest Greeting Pine and entrance to the cable car. If you want to have the tree to yourself, you’re going to have to start pretty early. As bad as this looks however, the distance to the tree wasn’t too bad and it took maybe 15-20 minutes or moving through the queue to actually get to the tree.
I affectionately refer to this tree as the Mona Lisa Tree because I have NEVER seen SO MANY PEOPLE trying to take selfies and pictures with 1 thing. It was hard to even get close; I basically scaled a small rock and even then I couldn’t get a great photo of it. I tried for a bit to have my photo taken with it when one lady really nicely let me down my small rock to stand in front of it. It’s still a terrible photo though so not sharing it here. haha
Once we took the trail past the tree, the crowds dropped off a fair amount but still a steady number of people seemed to be heading for the Capitol peak.
Which when I saw it, even I thought they were crazy. The stairs looked a lot like the “ladder to heaven” stairs and seemed never ending. They must’ve climbed 1000-1500 feet almost immediately with no break. (I’m talking worse than Angel’s landing- steep STEEP stairs) Granted our previous day had left me tired and somewhat sore, but even feeling fresh I don’t know if that peak would’ve held appeal for me.
But neither would what we ended up doing as it would turn out. My one piece of advice when it comes to exploring this mountain, is to TAKE THE CABLE CAR. On either the Eastern or Western steps, please don’t try to hike down them, and seriously don’t go about walking up them. While I’d read the scenery was much better on the Western steps (hence I chose to take the cable car up the East steps, and WALK down the west steps) I found it never ending stairs and boring. Seriously the steps. Never. End.
You hardly get any scenic views and just see a lot of trees. Save your time and energy for hiking the peaks up at the top and just take the cable car.
At the bottom of the western steps walking path, there is a beautiful building that sometimes seems to serve as a visitor center, and a shuttle bus stop. We bought our tickets back to Tangkou and hopped on.
 
Which, here comes mistake #2 of the day. We forgot that bus stop map photo I’d taken and so when the bus turned down a different road than we expected, we panicked and got off at the first stop. At that stop we were harassed with sellers as soon as we got off so we hurried away from the station. It wasn’t until we were well past the station that we saw the buses were going back to the main road and thus… were going the way we had wanted to go. *face palm
At this point we just continue to walk thinking the hotel we’d left our bag at was just down the road 10 minutes or so
 
We got off the bus WAY too early. Our stop we wanted was the very last one on the route!
That “10 minute” walk became a blazing hot 30 minute walk with little scenery. By the time we reached the hotel, we were dehydrated and exhausted from our walk DOWN the mountain and then through town.
The light at the end of the tunnel dawned however as we ate at the restaurant yet again (our favorite.. it was so good) and decided that since we had 6 hours until we needed to leave for the train station and had nothing to do, we may as well book a room. Lolololol Weird, I had a hard time explaining that since we were taking a sleeper train to Shanghai that night, we wanted a place to shower, change, and NAP before we headed on our next phase of our journey. $35 well spent my friends. That green tea foot soak was just as great on this day and the nap was even nicer.
 
 
At 5:30 we picked up some snacks/dinner for the train and our hotel called us a cab to take us to Huangshan train station. Here’s where it gets good again. Even though I clearly say HUANGSHAN and not HUANGSHANBEI I notice on google maps that our cab driver is taking us through weird back streets, neighborhoods, and most definitely NOT the most efficient way back to Huangshan town. When I tell him not to go to Bei, he doesn’t understand and thus we end up at Huangshan Bei (the HIGHSPEED train station that we’d first arrived at) anyways. So now we have an hour to go before our train departure. We show him our train ticket and say other station a few times and he gets it. So then we are off on another 20 minute ride back to the run down station in town. We did try to pay him extra for having to drive us further but he ended up giving it back to us instead of accepting it. Ah well. In we went where we had about 10-15 minutes wait in the large waiting room, and then we got on our train.
Photo from our next sleeper train, I didn’t get any of this one
 
It was an older style train for sure, with clunky sliding doors. They were bunk room compartments since we booked a “soft” sleeper so our bunk room had 4 bunks with Braden on the top bunk and I had the lower. We happily discovered that our bunk room was shared with a couple from the Netherlands who I enjoyed talking with for a 2-3 hours about our different experiences on the mountain and around town. It was even the latest we stayed up since we had our ramen noodle bowls and chatted for so long.
Sleeping was an experience. I slept rather well considering it was on a train, but overall I still only got maybe 5 hours of sleep. While maybe not the most “restful” sleep, I found the movement of the train comforting, and my individual bunk comfortable. The train provides a sheet to lay on top of, a decent pillow, and a really nice comforter. So moral of the story, I probably wouldn’t hesitate to book a soft sleeper again.
 
And thus concludes our epic trip around the Huangshan area, stay tuned for a recap post for hotel, trail maps, and useful tidbits to come all in one post!
 

Day 5 Costs:
Breakfast included in hotel
Shuttle bus to Tangkou $5.54
Lunch $19
Extra hotel… $35
Store $8.45
Taxi to train station $26.23
Sleeper train $99

Day 5 Total: $193.25

Pin me:

Hike to the Fairy Bridge

Day 4, part 2 continued: The hike to the Fairy Walking Bridge.
Once we reached the bottom we took the Northern rail car back up to the top which spit us out near the Baiyun hotel. (where I would personally recommend staying for location and reviews) We debated going to check in at our hotel but the day was still young (it was only 11) and we were right at the top of the SOUTH trail around the Western Sea. This was the trail I originally planned on taking all the way down but was told it was closed half way. 

Map of the trail to the Fairy Walking Bidge, then to Bright top peak to Flying-over Rock, and then onto our hotel. I circled Purple Cloud Peak even though we didn’t trek up there, as it would have made for an excellent sunset/ or sunrise spot. 
The top of the rail car was nice and serene. We stopped for a rest before continuing on along this beautiful tree lined path. 
The Southern path was still open to the Fairy Walking Bridge (even though it was closed just after) so we debated looking for lunch/ checking into our hotel or heading down. Since we were RIGHT at the start of the trail, we decided it would be our best bet to just do the trail first. The hotel advisor said it would take 2 hours RT to visit the Fairy Walking Bridge but there were signs at the start that said 2 hours TO it. Rest assured, it was a leisurely 40 minutes down to it for us. 
Looking across the way to the Northern Route you can actually see the path in several places if you look hard enough. 
The trail was WONDERFULLY devoid of people. We only passed 2-3 other small groups of 1-2 people each going down. No groups or loud speakers here. And while the trail wasn’t overhanging sheer cliffs, it did beat an amazing path through stone which I found equally beautiful. 
Trails Stats from the Rail Car to the Fairy Walking Bridge AND Hotel :
Distance: 7 miles
Elevation Gain:1,400 feet
Elevation loss: 1,400 feet
Estimated time: 3-5 hours
*These figures are based on maps I saw with distances and elevations of the points of interest called out and are rough estimations. 
Points of Interest: Turtle Peak (looking up at it), the Fairy Walking Bridge, The Western Sea Grand Canyon overlook, Bright Top Peak, Flying- over- rock. 

The Western Sea overlook

There were so many lovely views and sections of trail here, as well as lovely stone picnic table spots to take a short rest at. If I were to visit this mountain again, I would still prioritize this trail. 
Getting close. When you see the incredible pine tree cliff and look down to see the terrace, you are just about there. 
YES! Made it. We actually passed through the tunnels and crossed the bridge already to get to this spot on the terrace. 
The view looking from the bridge toward the terrace. It was amazing being surrounded by such tall, sheer cliffs. 
The South- West of Huangshan mountain, mountains everywhere! 
Looking up the sheer cliffs that somehow a trail weaved its way down 
a cute “little” fairy bridge 
Crossing the main bridge
balanced rocks easily seen from the terrace 
How is this place even real?! 
favoite
I wish I could tell you this epic bridge was constructed centuries ago by gravity defying monks fleeing religious persecution or something cool like that, but alas this was just built in the 80s to connect another one of the valley trails to the top of the mountain. (Amazingly we actually saw a few backpackers hike up from the valley this way) 
Looking down the crevice from ON the bridge… a long way down! 
Crossing back across the bridge to return.
Unfortunately the lighting, was terrible for the time of day we were at the bridge, with half the bridge in shadow making photos hard to get right. We waited around an hour or so to see if once the bridge was completely in shadow it would help. It didn’t really since the other wall was still so bright. So hungry and running low on water, we decided to call it and head back. It only took us 45 minutes hiking back but we were pretty tired and thirsty by the end.
Trail signs! 
Hiking back along this stunning trail
Lookig at the “flying rock” from the summit. You can see our hotel off on the right a little ways further
When we reached the Baiyun hotel, we bought the first bottle of water we found and realized we still had more up to do… We had to go up and over the Bright Summit to get to our hotel. (and this is why I recommend staying at the Baiyun hotel… hahaha)
Looking back up towards the bright top summit.
We made it to the summit in only about 15 minutes (of straight stairs) and picked the path my hotel receptionist told us to go on day 1 to our hotel. I imagined it as only 30 minutes walk but man… it was a tough walk of 3 km and almost an hour! We had a few more ups and a LOT more downs to do before reaching our hotel. It was still so hot. Thankfully I’d bought a souvenir fan down in town because I used that thing constantly. (Probably looked ridiculous, hopefully not offensive… but a necessary tool)
As exhausted and frazzled as we were, we couldn’t just walk on by without capturing this incredible “flying” rock. 
A sea of clouds… and mountains

We finally made it to our hotel around 3:30 and checked in. Unfortunately we were on the top floor of a 6 story hotel that lacked an elevator which meant.. more stairs. It was pretty run down inside and the layout was pretty bizarre… and don’t get me started on the room. Definitely our worst hotel of the trip (and 5 times as expensive as our hotel the night before) The 2 twin beds in our room were basically box springs with yellowing comforters. We found a few small beetle like bugs around the room, which left me on high alert for bed bugs. No A/C either which after sweating all day, made the room an un-welcome relief. Needless to say, we were pretty appalled. Did I expect luxury on top of the mountain? No but at least a little better than what we ended up with.

Dinner….
Anyway the show must go on, no matter how thoroughly exhausted we were, we still had hours in the day. We showered and rested a bit before going out in search of food. The hotel just before ours, Xihai seemed like an easy enough walk and a little more fancy so we thought we’d check their restaurant out… WELL It was closed for some reason. (5:30 PM…) so we’d walked that way for nothing. We headed back to our hotel which appeared to have a restaurant and a street food type vendor. Apparently they are one in the same. What was advertised as pick 3 entrees , rice, and soup was really, you get what you get: which in this case was 3 questionable entrees, rice, and hot seaweed water. It was pretty terrible. The thing on the left was more seaweed? With some other texture, probably tofu, that I couldn’t quite accept. The middle dish was just eggs and tomatoes so a little better, if at least edible. The last entree was sweet potatoes and the safest of them all. The hot sea weed water was as bad as it sounds, and rice was rice. 
Anyways, if you come here, just do yourself a favor and haul some ramen noodles up in your back pack. And if you don’t want to carry them, buy those at the little stores up top instead of trying to eat any of the street sidewalk food. 
We ate what we could and headed back down to the Cloud Dispelling Pavilion which was thankfully an actual easy walk (with few stairs) from our hotel for sunset. 
Crazy sun beam peaking over the mountains. The lighting and colors were just crazy beautiful
After hanging around for a while, we decided to continue along the Northern route again (the first hike we did) at least until we started to descend a lot of stairs. It was just so peaceful without all the people and with the magic lighting on the mountains. We probably went about 3/4s of a mile or so to the start of the descent where the tunnels start and what I’d consider the “opening” of the Northern route
No this is NOT a scene from Star Wars: The Last Jedi. What you’re seeing is the Cloud Dispelling Pavilion everyone. 
We caught some pretty sunset light at the Purple Cloud cable car station (and spotted the peak where most people apparently go to watch the sunset- Purple Cloud Peak)
Another view from further away of the Cloud Dispelling Pavilion with our hotel Paiyunlou behind it. 
The start of the tunnels and major descent down on the Northern Grand Canyon route. 
(This spot is maybe a 30 minute walk from the Cloud Dispelling Pavilion)
Exploring the narrow passage with the dying light
Straight drops from this viewing platform- you can see why these mountains are the 
“Yellow Mountains”
More views from along the trail at sunset 
Almost dark- so headed back to the hotel 
Sea of Mountains
We stopped at the little convenience shop on the way to pick up a coke and oreos to follow up our terrible dinner and spent the rest of the evening in our room. Thankfully at night it cools off SIGNIFICANTLY and with the window open, the room was just right. The room also had a nice small but deep tub that I soaped down and soaked in which was extra nice. Though we slept terribly due to fear of bed bugs (we had yet to spot any) it wasn’t as bad as we thought it might be. (because neither of us actually got bitten by anything)
So solid day! So glad we made it down to the Fairy Bridge and caught such a glorious sunset. Day 4 part 2- SUCCESS. 

Day 4 Costs:
Breakfast from store: $10.20
Shuttle to scenic area $4.08
Entrance to park $33.50/adult $16.75/student
Yungu Cable car ride $23.32
2nd tram ride/ Western Sea Rail car  $29.15
Large bottle of water $3.64
Dinner $20.11
Oreos and a coke to end the day $5.10

Hotel: Huangshan Paiyunlou Hotel $144

Day 4 Total: $289.50 for 2 people