52 Hike Challenge

52 Hike Challenge
What is it?
52 HIKE CHALLENGE IS A GLOBAL MOVEMENT EMPOWERING YOU TO TAKE A PERSONAL JOURNEY TO DISCOVER THE PHYSICAL, MENTAL, AND SPIRITUAL BENEFITS GAINED THROUGH HIKING ONCE A WEEK FOR AN ENTIRE YEAR.
THOUSANDS OF PEOPLE ALL AROUND THE WORLD ARE TAKING THE CHALLENGE TO HELP CHANGE THEIR LIVES IN A POSITIVE WAY, ONE STEP AT A TIME.


My Hikes
Hikes are in Utah unless otherwise stated
  1. Bonnevile shoreline trail from Orem to the Dry Canyon TH – 3 miles 

  2. Lake Blanche trail (didn’t make it all the way due to weather) – 4 miles 

  3. BattleCreek Falls  – 3 miles 
  4. Pine Hollow trail to Pine Hollow peak 5 miles  

  5. Desolation Trail to SLC Overlook 4.5 miles 

  6. The Living Room – 2 miles 

  7. Alpine Loop Road – 4 miles 

  8. Bells Canyon to the waterfall – 5 miles 

  9. Grove Creek Canyon – 3 miles 
  10. Ghost Falls – 3 miles 
  11. Eagle Crest Trail – 5 miles 
  12. The Wild Rose Trail – 3 miles 

  13. Canyon Overlook in ZNP – 1 mile 
  14. Hidden Canyon (ZNP) – 3.5 miles 
  15. Donut Falls – 2 miles 
  16. Horsetail Falls – 5 miles 
  17. Dry Canyon – 3 miles 
  18.  Diamond Fork Hotsprings -5 miles 
  19. Queen’s Garden/ Navajo Loop in Bryce Canyon- 3 miles 
  20. Capitol Reef- The Grand Wash – 3 miles 
  21. Capitol Reef- Cassidy Arch – 3 miles 
  22. Capitol Reef- Hickman Bridge – 2 miles 
  23. Heugh’s Canyon – 3 miles 
  24. to the “G” – 2 miles 

  25. Twin Peaks- The Avenues – 3 miles 

  26. Thira-Oia (Santorini, Greece)- 10 miles 

  27. Thira-Port-Thira (Santorini, Greece)- 1.5 miles 

  28. Bluff Point State Park loop (Connecticut)  – 3.5 

  29. Buffalo Peak – 4 miles 

  30. the “Y” – 2 miles 

  31. Timpanogas Trail to see the lower waterfalls -3 miles 

  32. Ferguson Canyon – 4 miles 

  33. Timpanogas Caves – 2 miles 

  34. Willis Creek Slot Canyon – 2.5 miles 

  35. Escalante Petrified Forest loop – 2 miles 

  36. Combined Rocky Mouth Falls and Grotto waterfall for 2 miles 

  37. Cecret Lake-Sunset Peak-Catherine’s Pass – 8 miles 

  38. The Cliffs at Etretat France – 4 miles 

  39. Sugarloaf Peak – 4.5 miles 

  40. Wolverine Cirque – 8 miles 

  41. Haifoss (Iceland)- 2 miles 

  42. Svartifoss (Iceland) – 2 miles 

  43. Glacier Hike (Iceland)- 1 mile 

  44. Glymur (Iceland)- 6 miles 

  45. Battle Creek- Grove Creek loop – 10 miles
  46. Stewart Falls – 3 miles 

  47. Frary Peak – 7 miles 

  48. Pine Hollow Trail – 4 miles 

  49. Willow Heights Lake – 1.5 miles 

  50. Big Springs – 3.5 miles 

  51. Upper Falls – 1 mile 

Total Mileage for 52 hikes: 187 miles

Paris in 3 days

How to visit Paris in 3 days

Tips:

1. Get a Museum Pass– This will save you money and most importantly TIME standing in lines at places such as the Louvre, Versailles, Arc de Triomphe, and Sainte chapelle.
2. Unless you hate walking, you don’t need a metro pass. We were there for 3 days and besides taking the train to Versailles and from the airport, we took the metro/buses 7 times (approx $14 over 3 days)
3. Bakeries are literally the budget way to eat. You can get sandwiches, pizza slices, etc for lunch and dinner, plus need I say anything about breakfast? and literally eat for less that $10/pp/day.
4. Did I mention prepare to walk yet? Bring your serious best walking shoes since this city is SO BEAUTIFUL, you will do a lot of walking.
5. Explore all you options for night stays. I was mostly looking into Airbnb until I realized hotels were cheaper. (This has been the case in other cities like NYC and Venice for me as well) Unless you like hostels, don’t forget to check hotels for a good deal since those might be the cheapest option. (apart from bunk rooms which I don’t fancy, sorry)
Where we stayed -> Hotel le Pavillon
6. We found you can bring a tripod with you ANYWHERE. If you are a photography nut like me, don’t be afraid to haul it around. You will have to open the tripod bag at security and several places won’t let you USE the tripod inside, but you can bring it with you. Same goes for purses. A lot of museums these days require bag check  for backpacks or large bags but we were fine with my travelon purse and tripod.
7. Beware pick pockets and scammers. (Here is a link to the most common scams) I use a Travelon purse and so far it’s served me well. Here’s what I use: Travelon Crossbody Purse *This is an affiliate link- if you make a purchase using this link, I earn a small commission at no cost to you.
8. Rooftops for best views of the city and Eiffel Tower: Arc de Triomphe, Galleries Lafayette, Notre Dame, and Montparnasse tower. I was only able to experience the Arc de Triomphe but it was pretty spectacular.
9. My general travel tip for just about any trip (not just Paris) pay the price to have data/cell service abroad. We pay $10 a day for unlimited data and text plus 100 min calls. It is a DREAM to be able to google maps all your destinations (Google is great at advice on public transport) as well as information about our destination like hours/cost/ stuff near by.
10. Last tip: CHECK museum hours before your trip. They tend to close on odd days and you don’t want to miss any of these spectacular museums because of the days you are there. ie. The Louvre is closed on Tuesdays, Musee D’Orsay, Versailles, and the Catacombs are closed on Mondays, etc… We were there over a Sunday, Monday, and Tuesday.. which is why the below itinerary is laid out like it is. 

Day 1:
1. Find your hotel and check in if late enough or drop your bags off so you don’t have to haul your stuff around with you. 
2. Your first museum: the Musée de l’Armée. (Plan on anywhere from 1.5 hours  if you’re fast to 3 hours if you want to take it all in)

3. Visit the Eiffel tower (if you want to go to the top, times vary depending on queue length and if you take the elevator or stairs.) 
4. Visit the Arc de Triomph- Go to the top!! (Getting the Museum Pass or City Pass will save you loads of time here as you skip the entire line. The Queue can vary, but with the pass plan on at least an hour for all the step climbing and taking in the view at the top and bottom!)

5. Stroll down the Champs-Élysées and do some shopping (or window shopping!)
6. Get an early night, so you can get an early morning! (also to recover from some of the travel exhaustion you’re bound to be feeling!)
Day 1 Budget:
Train from airport to city center: $20 for 2 people
Museum Pass: 4 day pass at a cost of 167 for 2 people divided by 4 days: $42/day for 2 people
Lunch of panini and crepe: $14 for 2 people
Hotel: $120
Day 1 total: $196 for 2 people

Day 2:
1. Get up and out bright and early if you want to take any photos without the crowds. We re-visited the Eiffel Tower (around 7AM since it was Summer) as well as the bridge Pont de Bir-Hakeim for a couples photo shoot. (for which we lug around our tripod all day with us)

2. Get over to the Louvre BEFORE it opens in the Summer. (around 9) It’s a bit of a walk but a beautiful one from Place du Trocadero, passing the Grand Palais and Petite Palais, the stunning bridge Pont Alexandre III (which frames the Musee de l’armee beautifully), and then through the Tulleries Gardens without the crowds. Walking distance= 4 km or around 1 hour

3. Spend a few hours exploring the multiple wings of the Louvre. We visited both the French Sculpture wing which I LOVED as there was almost no one first thing in the morning and it had such an open airy feel. Then make sure you visit the Greek, Etruscan, and Roman wing to see the famous Mona Lisa, the Winged Victory statue, as well as my favorite: Lady Liberty leading the people.

  • We spent approx 2 hours in the Louvre which I felt was enough to hit the big stuff. However if you are an art guru, you could literally spend days exploring.

4. Again more walking, head over to the Île de la Cité. I would HIGHLY recommend walking along the Seine here. The views are beautiful and once you approach Pont du Neuf (the oldest bridge in Paris), you get a killer view of the city and your next destination: The Concierge.
Walking distance =1-1.5 km and around 20-30 minutes. 

5. The Concierge for a taste of the original architecture in Paris as well as the bloody revolution since it’s most famous prisoner during the French Revolution was none other than Marie Antoinette. (appox. time here about an hour)
6. Next stop: my favorite building in all of Paris, the Saint Chapelle. This is one of those stops that a museum pass pays off it’s value as you can skip the line and go right in. Enjoy a kaleidoscope of the most brilliant stained glass ANYWHERE.

7. It’s an easy walk now to Notre Dame a few blocks away. It’s free to enter the chapel and there will likely be a queue to get in. Make sure to be respectful since this chapel is still used for worship and dress modestly and speak quietly. After that, exit the building and walk around to the North side to climb the towers and visit with the gargoyles if you wish.

8. Hop the nearest metro to check out Palais Garnier: the Paris Opera house. The queue outside is to get through security but it is easy to buy tickets at kiosks inside. We forgo the extra for audio headsets so explored on our own. This building was AMAZING and GLAMOROUS and I wouldn’t skip it but if you have little interest in opera and short on time, it isn’t a must do. (expect at least 1.5 hours to queue and explore)

9. Right next to the Palais Garnier, is the massive shopping center- Galleries Lafayette. This can be a quick stop to see the incredible stained glass dome ceiling, or a longer stop to shop and grab a snack/drink at the rooftop cafe. Since we toured the opera house, we had less time so this was quick.
10. Again hop on the metro to find your way to the last stop of the day: Montmartre. The metro drops you off at the bottom. There is a train that can take you to the top of the hill, but if you have energy/time, explore the alleys and shops while making your way to the top.

11. Check out the Sacre-Coeur Basilica. Like Notre Dame it is free to visit but please be respectful while inside. From the top of the hill you have an amazing view of all of Paris, can photograph the “leaning building” and relax on the steps to what is without a doubt, a beautiful building.

12. With the rest of your day, grab dinner/ explore Montmartre, check out Moulin Rouge, head back to your hotel where ever it may be.
Day 2 Budget:
Hotel: $120 for 2 people
Museum Pass: 4 day pass= $42/ day for 2 people
Breakfast:6 euros for bakery snacks
Lunch: 14 euros for 2 sandwiches and bottle of water from Louvre
Dinner: Panini and quiche from bakery along with a chocolate bread for 11 euros
Opera tickets: 16 euros
Metro tickets throughout the day: 11 euros for 3 trips total
Day 2 total: $220 for 2 people

Day 3:

1. Versailles, like the Louvre, can be an all day event but if you only have 3 days, then you’re probably thinking more of a half day. Either way, get up early and head out to get to Versailles AT LEAST 30 MIN BEFORE OPENING. Versailles is THE MOST visited attraction in Europe and the lines can get hours long to get in. Even in the apex of the tourism season, we got there 30 min before, and waited in line till 30 minutes after opening. (1 hour total) Make sure to have your tickets purchased ahead of time. Plan on at least an hour to tour the inside of the palace, 2 hours if you take the audio tour.

2. If Angelina’s cafe is on your list of things to try, opt for getting it at Versailles as there was next to no wait in the morning. We tried a coffee and a hot chocolate. (The hot chocolate is what they are famous for) Make sure to have a bottle of water handy for after.. you’ll need it!

3. Explore the gardens. The gardens are massive and so fun to explore. I recommend making your way down 1 side of the maze, and then returning up the other. If you have time, the little row boats on the grand canal are affordable and a lot of fun. There’s also bikes to explore the larger grounds.
*Note: You could also visit Trianon and Marie Antoinette’s apartments which are a separate admission fee and typically don’t open until the afternoon.

Explore the gardens on foot/ bike/ or boat! 

4. Here you can decide on Trianon, a walking/nap break, or visiting the last major museum in Paris. We opted for the last option: the Musée d’Orsay. Plan on at least an hour to see the highlights, 2 hours to see most of it. In an hour we saw all of 1 side, took pictures with the clocks, reveled in the Impressionist wing, and selfied it up with the “Portrait of himself” by Van Gogh.

5. Last major highlight of any trip to Paris: The CATACOMBS. This will require taking the train out pretty far from the center but is so worth it. If you are going during peak tourism season, BUY YOUR TICKETS ONLINE. It is an additional  $10 or so but so worth it. We did a 6:00 PM tour which lasted about an hour and when we got there the line was horrendous! (We’d read that evening time is usually shorter too!)

6. Head back to the city center, grab dinner at a Parisian cafe, and enjoy the sites at night. We hauled the tripod again around with us to take photos at the Louvre after closing hours and without crowds. (This was most definitely our favorite night time hangout spot), then did some nighttime shooting at the Arc de Triomphe, and called it a night finishing up at the Eiffel Tower as it sparkled and dazzled.

 The Louvre courtyard is the most romantic peaceful spot in the evenings! 

Day 3 Budget:

Hotel: $120 for 2 people
Museum Pass: $42/ day for 2 people 
Breakfast: from our fav. bakery again 6 euros
RT train tickets to Versailles: $14.50 for 2 people
Angelina Hot Chocolate: 8 euros pp plus another 5 euros for a coffee so 13 at this stop 
Versailles Gardens during Musical fountain show day: 20 euros for 2 people

30 minute row boat adventure: 13 euros

Lunch: quick stop at Mcdonalds for 10 euros
Dinner near the Louvre: 43 euros
Paris Catacombs online tickets: 29 euros/ person so 58 euros for 2
Total other transportation costs for the day: 15 euros
Day 3 total: 354.50 

Budget for all 3 days/ 2 people: $770.50

Day 4: 
Fly home or continue your journey around France. 

Iceland: Hiking Glymur

Day 9: Last day of our trip! so we had to make it EPIC. Thankfully the weather held out for us today as well so we got to do an actual legit hike to Iceland’s tallest waterfall
GLYMUR


The hike is only about an hour away from Reykjavik and was right about half way back in our case. You follow more stunning Fjords along the drive like the one above! 
We got there bright and early to beat any possible crowds so we were briefly in the shade but not for long! 
The start of the hike had excellent well marked signs! 
Trail stats: around 7.5 km RT (depending on route) and plan for 3-4 hours
Elevation gain: 245 m or around 800 feet 
Parking is free and there are NO FACILITIES at the trail head.
 or really any close by for that matter 
There are 2 routes, I would HIGHLY recommend going up the “normal” marked way as A. it is easier to follow and B. you’ll want to experience this side of the canyon no matter what and it would truly be more terrifying coming down than going up.. you’ll see what I mean. 
After not too long you’ll come to this cave/ tunnel overlook which is actually where the trail passes through! 
The view through the other side of the tunnel. 

There are 2 large cave openings here. You can see the trail continues from the one on the left 
10 minutes into the hike and already loving it! 
The view once you emerge from the cave. A little further down you’ll have to cross the river and start your uphill trek. The narrow canyon up there is where Glymur is!!! 
A waterfall you pass along the way. 
The RAGING river crossing we were holy unprepared for! We had read that there is a log crossing.. which there is but as you can see it only covers about HALF the river. Apparently you can normally have a dry crossing but not us! NOPE round 1 of taking our shoes off, strapping them to our bags, and wading across. This actually turned out to be fairly EASY and crossing the log was infinitely easier barefoot than with clunky boots on.. so maybe a blessing none of us slipped and fell off the log! haha 
First look looking back towards the caves and initial overlook 
You can see the log crossing up ahead! EEEEEE
Starting the climb up post log crossing
And a little higher. I must say that the next part after the log crossing was pretty CHALLENGING. There were parts that were so STEEP we had to cling to a rope to pull ourselves up. The ground was muddy and wet and needless to say, I did not look forward to coming back down this way. 
Braden looking down the canyon 
Risking my life to go stand out on that ledge… to look absolutely tiny in this amazing landscape! 
(jk mom… it wasn’t THAT dangerous)
You can see the big amazing fjord we drove along to get to the parking area! 
Our first glimpse of the waterfall! Along with all the other waterfalls emptying down into the same canyon! 
And another viewpoint a little bit closer up. The waterfall is TALLER than what you see as it has a few ledges that are above the narrow canyon walls. 
Continuing to climb up along the edges and passing may more waterfalls 
Blue sky graced us with its presence again today! 
Waterfall facts: 193m(643 feet) tall
I loved how the canyon narrowed and is covered with moss ! So pretty! 
Looking back down along the canyon. We’d come a long way! 
The top of this magnificent waterfall! So big, there’s no way to even fit it all in one photo! 
We’d read that there is another trail on the opposite side of the canyon and waterfall and had SEEN people hiking up it across the way. Since it was SO STEEP and scary at times the way we came up, we figured we’d attempt to LOOP hike it and go down the other trail. 
A peaceful river flows directly toward a 645 foot drop of a waterfall… 
Looking upstream at the river
The loop requires a SECOND river crossing, 1 much more challenging than the first. 
The river is thankfully fairly shallow and gentle, but extremely WIDE and ROCKY. With chacos or water-shoes, this would probably be a cinch. But wading across barefoot (water wasn’t that deep but DEF too deep for all our boots) with $1000 worth of camera equipment around your neck was definitely NOT my cup of tea. 
But we all made it across and have never been so happy to put warm dry boots back on my feet while hiking. haha 
The reward was a view from the opposite side to see the water as it serenely falls off a steep cliff. 

It was worth the pain of 1,000 sharp rocks under my feet to see the top of these falls from both sides! 
Serene indeed. Look out below! 
2nd reward: getting a bigger picture of the top of these falls 
So keep in mind future wanderers, if you choose to go up the easy side and avoid all river crossings, this is the most of the waterfall you’ll see as all of the other shots can only be seen from the OTHER side. Considering the steep climbs and mud, I would DEF recommend coming up the other way and down the more gradual sloping way if you want to loop like we did. 
Both sides of the canyon definitely have beautiful perspectives of the waterfall! 
Looking out toward the fjord and amazing fall colors! 
This is where this trail gets TRICKY. There are 2 routes and several foot paths that are NOT trails. If you follow the CAIRN towers, this will be a LONG route as it winds itself over beyond the car park and has to back track back. The other trail I believe starts right around this area and follows the canyon cliffs back down. 
Unfortunately we did a sort of… combo. We followed the cairns until we saw how far it was going out of the way, then we followed a spur trail that very much looked LEGIT, but took us to NO WHERE. Begin out time being absolutely LOST in Iceland. haha We spent quite a lot of time bush whacking, getting excited thinking we found THE trail when really…. it wasn’t and having our hopes dashed SEVERAL times. It probably took us twice as long as it would’ve to get back down but eventually… we found the actual trail… several muddy boots later. (I think I was the only one who didn’t fully douse my foot in a mud pit.. and that my friends is why I am a slow hiker haha) 
Ah, a welcome site the car park which had seriously filled up while we were hiking. (There were only like 4 cars when we started)
And can you guess which vehicle is ours? lol We conquered quite a lot of mud and dirt roads on our round trip ring road drive. 
Continuing our drive back to Reykjavik we were rewarded with a beautiful rainbow over the fjord!
We finished in the afternoon and just had a short 1 hourish drive back into Reyk! Awesome and the sun was still out 😀 
Considering the misery rain we faced on day 1, this is my follow up for what Reykjavik looks like in the sun.. not too mention a few more stops. Since it was our last night in Iceland, we had to make the most of it! 
Starting with the maybe overly touristy, AWESOME
Hallgrímskirkj
While certainly not the oldest church I’ve been to in Europe (not even close) I have to say the Hallgrímskirkj church is beautiful! It’s free to visit and located pretty close to the city center and other fun places you’d go anyway! 
It took 41 years to build this church with it being completed in 1986. The recognizable tower is 74.5m (244 ft) high making it among the tallest structures in Iceland. 
Unlike other European church in France/ Italy, this cathedral wasn’t boasting in stained glass and ornate details however I loved the clean lines and light that was let in. The 5275 pipe organ was also an impressive site in the back of the church. 
Decorative design on the metal front doors of the church 
Also unlike the older churches of Europe, this modern building has ELEVATOR access to the observation tower. What an idea! Then again… It somewhat took away from my experience to not have to climb a million stair to get a view. You puchase tickets for the tower in the small store at the entrance to the church, then join the line waiting for the elevator. It’s a small elevator that only allows 6 people at a time so depending on how long the line is.. may take a while. We hit it at a slow point so we were up in a matter of minutes! 
View of the rest of the church from the tower 
If you want any sort of view of Reykjavik then I highly recommend forking over the money to ride the elevator to the top. It was worth it to take in the coastal views and colorful buildings from above in my book. It’s a quick stop depending on how long it takes you to walk around 4 corners but if you love a city view, don’t miss it. 
Panorama of the city 
Braden snapped a shot of me gazing out the window at the city. 
*The top of the tower is NOT insulated… which is great since you don’t want foggy glass mussing up your photos, but… dress accordingly. 

Last view of the city with Mt. Esjan (another popular hiking destination) is the mountain shrouded in clouds across the way there

Hallgrímskirkj Observation tower Practical Information:
Winter Opening Hours
October – April: 09:00 – 16:30
Summer Opening Hours
May – September: 09:00 – 20:30
*Services: The tower is closed on Sundays from 10:30 – 12:15 during mass at 11:00
Cost: Entry to the tower, adults: ISK 900
 Children 7-14 years old: ISK 100

Clock in the tower as you wait for the elevator to go back down
All in all we were up and down in 20 minutes and waiting for our friends to meet back up
I pose for a photo outside the church.  
More fun building architecture to photograph! 
The statue of  Leif Eriksson (c. 970 – c. 1020) by Alexander Stirling Calder in front of the church. This statue was actually a gift from the United States in honor of the 1930 Alþingi Millennial Festival, commemorating the 1000th anniversary of Iceland’s parliament at Þingvellir in 930 AD
For those of you who DON’T know who Leif Eriksson, he is credited with being the first explored to DISCOVER NORTH AMERICA. (Right?! What about Columbus…?) That’s what I said… ANYWHO he was a Norse settler from Iceland/ Greenland and he is credited with beginning a settlement in Newfoundland, Canada. 
More of the DOORIIEEE details
(See what I did there?) 
After our visit to the church we explored a bit more of the city (in the not warm but at least DRY weather) and it was off to a much better start than our previous Reykjavik day. 
One of the restaurants/ bars in the city 
First up we visited the Iconic Lebowski Bar for Happy Hour. 
I was in it for the French fries personally which were delicious I’m happy to report. 
Details of the Lebowski bar bathrooms 
If you’re wanting to enjoy all Iceland has to offer in way of beverages, your most affordable way is to definitely explore during Happy hour! 
Sign above the Lebowki bar. I loved the patio sign haha (steaming 5 degrees Celsius…)
Bowling alley on the wall 
Next up we visited the Laundromat cafe
This place does NOT offer a happy hour and serves hot Chai tea in a very inappropriate (soda?) glass but otherwise was pretty good! It boasts loads of books!, coffee/drinks/food, a children’s play area, and of course… a laundromat. 
The play area/ children’s books were downstairs next to the laundry facilities but all in all I thought it was a fun idea and the Chai I had was pretty good. (Just not served in an insulated cup!… like it should be) 
We ended the night at a cheap shawerma place called Ali Babba that was on the same street as the other cafes/ restaurants. Braden and I were still living somewhat off the giant thing of fries from earlier so we easily shared a plate. All in all the meat and rice here were delicious and MUCH more affordable than city restaurants. 
And then it was like returning home as we stayed in the same Airbnb our last night as our first night. 
We liked it THAT much. 
Link to where we stayed
Then the next morning we were up an out by 6AM to catch our flight home

Day 9 Total driving distance and time: 135km and 2 hours

Day 9 Costs:
Rental Car breakdown for 1 day/2 people: $66
Gas breakdown average/ day for 2 people: $18/ day
Airbnb apartment (with 1st time user of airbnb discount): $184 for 4, or $92 for 2 
Chuch tower – $17
Large shared plate at Ali Baba’s – $17
Lebowski Bar fries and 1 drink at happy hour– $14.50
The Laundromat cafe (coffee and chai tea)- $10
PARKING IN REYKJAVIK IS FREE ON SUNDAYS
Total Cost for Day 9: $235.50 for 2 people

TOTAL TRIP COST for 9 days/ 2 people: $2,697 (not including flights) or $4,210 with flights 

Driving Totals for the Ring ROAD: 2,355 km and around 33 hours in the car 

Journey to the Center of the Earth

Day 8: Our journey to the center of the Earth 
Just kidding, but also not really because those of you who know your Jules Verne, know that one of the supposed lava tubes that gain access to the center of the Earth is actually located in a volcano on the Snæfellsnes Peninsula. 
So that is what today is about! Discovering waterfalls (surprised?) volcanoes!, oh and some incredible fjords along out drive! 
I literally took all 3 of the above photos from a moving car, half crushing Braden as I had to lean over him to get the shots. (He lucked out and was on the right side of the car this day for driving…)
Though we definitely had to stop a few times to admire the incredible coastline and fjord views. 
Also I was super stoked to FINALLY have weather dry/ warm enough to wear the dress I brought along! 
Troll land again! 
Our first stop as we haeded SE, was the overly famous:
Kirkjufell
We drove through the town Grundarfjörður, shown above is the incredible view from Kirkufell.
The town has a small grocery store and tourist office and after that is just a short drive to the Kirkufellfoss!
The foss is beautiful but after all the other incredible waterfalls we saw in Iceland… it was kind of meh. Especially considering the hordes of people around it! 
Kirkufell mountain on the other hand, was awesome to see in person! It has such a cool shape and sits like a peninsula out on the water. The mountain is 463 m high (just over 1,500 feet) and has been featured in dozens of outdoor catalogs not to mention the latest season of Game Of Thrones! 
The iconic short of the waterfall and mountain together
There is a large free parking lot but otherwise no facilities at this site so you’ll want to stop in the town for lunch foods/ toilets before continuing on around the Snæfellsnes peninsula. 
And the sun has finally emerged! Look at that! BLUE SKY!
We immediately knew we had to take advantage of this sun shine and scenic drive, and what better way than with a picnic (which luckily we had the supplies since we’d essentially been doing this everyday IN the car so far) There we lots of pretty pull outs but a sad lack of picnic tables. We drove a little ways along and ended up at a nice picnic area with rubbish bins in the small harbor town of Ólafsvík, about 20 minutes further along Rt. 54.
The town was small but cute with a waterfall and cool looking church 
Next stop: Dritvik Djúpalónssandur
About another 30 minutes along the circuit and on right about the SW tip of the peninsula is a national park with cool beaches and a lovely walk. See that line of rust colored fragments on the beach? Those are actually oxidized fragments of a ship wrecked British fishing trawler that was wrecked back in 1948. 
The parking is FREE and there were decent free toilets at this stop as well. The trail to the viewpoint of the beach is very quick and short but to go down onto the beach expect to walk an easy 1.5 miles RT. That being said the trails runs along this really cool rock formation which would be fun to take a look at on your way. Unfortunately this was the coldest and WINDIEST stop of our day so we just got out to take a quick look around and continued on our merry way. 
Remember that story about lava tubes to the center of the Earth? Well you’re looking at one ! The Snæfellsjökull volcano is the setting for Jules Verne’s Journey to the Center of the Earth and this volcano definitely dominates the SW tip of the Snæfellsnes peninsula.
The Snæfellsjökull is 700,000-year-old with its last eruption taking place all the way back in 200 AD ( give or take150 years)
The national park is actually named after this mountain/glacier and there is a nice FREE visitor center for the park just past Dritvik. (I took this photo of the volcano from the parking lot) There is a lot of good information about the volcano and the history of the area as well as free toilets! You also have a nice view of a lighthouse from here. 
And then another short drive to our last anticipated spectacle of the day: Port Arnastapi.
There are a couple places to park and get out to stretch your legs. We drove all the way to the end first where we got this iconic Iceland shot. Then we back tracked to the sculpture of Bardur Snaefellsas statue parking lot to see some Sea arches!
This first one was just past the statue and an easy walk! 
Mind where you walk and try to stay on trails… you never know when the ground might just… open up to a giant pit like the one below! 
But look at all the Basalt!!! AHHH
Photo taken from a spot STANDING on an arch. 
The most Instagram worthy arch in the business! Such an incredible geological feature! albeit a little scary to think of falling off… That being said IF you want to find this spot, go LEFT at the statue. It is a pretty short and easy walk along to find this arch and definitely recommend it! 
Continuing along the peninsula the clouds were rolling in over the top of the mountain ridge. So I give you another moving car window pic. 
And of course another roadside waterfall!
We headed into Borgarnes to pick up some groceries for dinner and then headed out to what is probably the BEST AIRBNB EVER. 
Just 10-15 minutes off the main road 54 is this Airbnb CABIN. It had room to sleep 6 with 2 bedrooms and an upstairs loft. The kitchen and space were amazing and having the private rooms again was nice after our previous 2 nights of bunking. 
And the best part? The amazing views from our front door! Fall colors GALORE and a stunning sunset! 
Fall colors and one of the few other cabins close by 
Amazing porch AND A HOT TUB!!! We loved this Airbnb!
Amazing sunset, amazing cabin
We got ourselves one giant filet of arctic char and some yummy veggies from the store so not only as it one of our fav lodgings of the trip, but just may have been one of my favorite meals as well! This is one place I could’ve stayed longer! 
Total Driving time and distance: 5h 30min, 400 km
Day 8 Costs:
Breakfast: included again! 
Lunch: picnic’d with groceries (about $10)
Dinner: a giant filet of arctic char for $21
Night 8 airbnb cabin: $170 for all 4 of us, so $85 for us 2

Rental Car breakdown for 1 day/2 people: $66
Gas breakdown average/ day for 2 people: $18/ day
Day 8 Total Costs: $200 for 2 people 

Exploring Northern Iceland

Day 7: Again breakfast was excellent and included and we had quite the day planned (one where maybe, just maybe- we would get a glimmer of sunshine on the activities of the day including Godafoss waterfall, Akureyri, Galumber farm, and ending at the beautiful Gauksymri lodge on the coast. 
We just had a short 20 minute drive to our first stop: Goðafoss


There are 2 viewing banks for this waterfall, both however easy to reach and with different perspectives so we visited both. I particularly liked how close you could get to the falls on this side, however it was also quite a bit more busy. 
Standing on the edge! Unfortunately all of the recent rain made Goðafoss quite… brown. 
Goðafoss is about 12 m (40 ft) high and 30 m (98 ft) wide! 
It got its name in the year 1000 when the lawspeaker Þorgeir Ljósvetningagoði made Christianity the official religion of Iceland. According to myth, it is said that upon returning from the assembly, Þorgeir threw his statues of the Norse gods into the waterfall making it the waterfall of the gods. 

Selfie from the other bank of Goðafoss. 
Waterfall of the gods 
Parking is free and easily accessibly from the ring road on both banks. There is also a pedestrian bridge and a short walk if you would rather walk between the banks. Facilities are on one bank including a small cafe, souvenir shop, and toilets. 
Up next we headed into Iceland’s largest city in the North: Akureyri
The town sits on the SE corner of a giant Fjord which made for impressive views as we drove the ring road down into town. The history of the town shows that it took quite some time to develop despite some Norse settlements in the 9th century, no permanent settlements were established until 1778. Even then it would be another 100 years before the city became established as a city. 
That being said the city is only second is urban space to Reyk, and has a fun culture about it with many restaurants and even a botanical garden. 
Exploring some souvenir shops in downtown. We didn’t make it out of there without some cool things including the warmest pair of gloves I’ve ever owned! 
The troll child beckons you in to spend money. 
We explored the main part of town and stopped in at the Backpackers cafe for a light lunch/ snack. 
The church/ cathedral is an easy walk from the main city thoroughfare and has great views of the city.
Looking down into the town from the church 
Note* Parking is Akureyri is VERY confusing and unlike any other parking system I’ve seen… but it is FREE. Here’s the deets:
Parking is free but you need a clock-card where you set the time of arrival. Parking areas have maximum parking times displayed. You set the clock to show your time of arrival and if you exceed the maximum parking (or try to cheat by setting the clock ahead of the actual time) you run the risk of a fine. The clock-cards are available for free in banks, info-centers, hotels, petrol-stations and many shops in Akureyri. In case you don’t find a clock-card, write the time of parking on a piece of paper and display it in the front window of the car. 
*We actually saw a parking (police?) walking around inspecting clock cards so they do check. 
*Note that clock-cards only apply for the town center. The free parking time is different according to each area ranging from 15 minutes up to several hours.
The view of the fjord from town
The top things to do in Akureyri are an aviation museum, botanical garden, oh and Santa’s House! Unfortunately we were museum’d out and Santa’s House had weird hours only in the late afternoon. So Botanical Gaden it was! 
We loved the magical feel of the gardens with the lights strung all around. 
Akureyri actually has a very interesting climate that allows for this botanical garden (without greenhouses). As it is quite a bit inland and protected on all sides by mountains, the winds are kept very calm. The harbor is also one of the calmest in Iceland and one of the few in the north that doesn’t have issues freezing. Akureyri has a subpolar oceanic climate bordering a subarctic climate with cold though not severe winters and mild summers. The snow cover starts forming in late October and melts in April. Akureyri is also a very cloudy town (if you couldn’t tell from my pictures haha) averaging only 1047 sunshine hours annually, with barely any sunshine between November and February. Precipitation on the other hand is much lower than in southern Iceland: as little as a fifth as much rain as in Vík. 
Wandering Iceland’s version of a garden 
The botanical gardens are free to walk around and there is a cool cafe located in the middle that had some pretty stellar looking desserts. (We’d JUST eaten donuts from a bakery however so we missed out on that) 
Berries on trees making up some of the color in the garden
Paths through the garden 
The cool cafe located in the gardens 
After the city, we headed on towards our next destination: 
Glaumbær Turf House
Another decently short drive and we started to see some blue skies! Glaumbær is about 20 minutes each way of the ring road but definitely a must see when in the area… for the scenery if nothing else. 
Though I may be biased by the final blue skies and horses in the area…. 
There are 2 timber buildings on the grounds that house a gift shop/ tea house and administration offices for the museum. Parking is FREE and there are even free toilets. 
A farm has stood on this site since the settlement of Iceland in ca 874 – give or take a few years with people still living in Glaumbær turf house until 1947. The present farmhouse consists of 13 buildings and the “newest” addition to the turf house was built in 1876-1879. The oldest parts of the turf house are from the mid 18th century! In 1947 Glaumbær was declared as a conserved site and is now owned by the National Museum of Iceland. There is even a small museum inside the farm that depicts what life was like to live in turf homes in the 18th/ early 19th centuries. 
The site is FREE to park and walk around, an easy spot, and quite scenic! The museum definitely looked interesting but was a bit on the pricey side. If you are interested in going inside here is the practical information:
Hours: Sept 21-Oct 20 April 1 – May 19: 10.00 – 16.00, mon-fri
May 20 – September 20:  9.00 – 18.00, daily.
October 21 – March 31: Open mon-fri by request.
Cost: 1700 ISK per person (age 18+)
1500 ISK for groups (6+) and students
Free for children (age 0-17)
It also happened to be out near Glaumbær that we finally happened upon a great horse farm for Katie and I to fulfill our insatiable (to this point) desire to take photos of the Icelandic horses! There was a farm with loads of them and an easy pull off for us to park! Score! 
Granted when we first stopped, the horses were VERY far away and it took at least 10-15 minutes for them to get interested in us and wander closer. It seemed to help whenever we started walking back to the car they would come closer. haha They just about came right up to the fence in droves!
And bonus there were MANY COLTS! The colts were SO CUTE to photograph. Scroll all the way to the bottom to see a a bunch more photos of these magnificent horses! 
Photo taken during our drive from Akureyri on to Gauksymri. 
Interesting mountain peaks out near Glaumbær
And no road trip day of Iceland is complete without a good roadside waterfall
Snow!
Last interesting drive pic! 
And another decently priced night in a bunk room all together! We had actually no idea that the Gauksymri lodge was on a horse farm… complete with horse trails and race track otherwise we may have saved out riding tour! haha The land was beautiful and the place was a great price and location to break up our drive from Northern Iceland and launch us to the Sneafellsnes peninsula the next day. 
View from our window of some horse fields and the horse track 
To find more information about room options at this lodge, click HERE
We really enjoyed our stay as the beds were comfortable and the breakfast the next morning was fantastic! 
The bonus is that this lodge is just a few minutes outside the small coastal town of Hvammstangi and the owners of the lodge own a great restaurant right down on the water. And since if you bring your key for your room along with you they give you a 10% discount, there was little competition in our minds for dinner. 
View from outside the restaurant 
Sjavarborg Restaurant actually sits above the Icelandic Seal Center which was on our minds of visiting but unfortunately closes early around 5 PM. 
The restaurant was very nice with decent prices (burgers around 20-25) and super delicious curly fries. We also lucked out with seats right by the window so got to enjoy ocean views as well. 
Sjavarborg Restaurant inside 
Outside the restaurant and Icelandic Seal Center. After our fantastic dinner we headed back to the lodge where I promptly entered into a food coma. haha It was so nice to be warm and dry and well fed! All in all…. highlights of the day were 1. horses and 2. turf houses. haha 
Total driving distance and time: 300 Km and 3 hr. 45 min
Day 7 Cost:
Breakfast: gloriously included in night stay
Backpackers snack and coke: $12
Donuts: $4
Dinner at Sjavarborg Restaurant with 10% discount for 2 burgers $43.50
Rental Car breakdown for 1 day/2 people: $66
Gas breakdown average/ day for 2 people: $18/ day
Gauksmyri Lodge: $215 for 4 people, $54/pp
Day 7 Total Cost: $197.50

And as promised, scroll down for more pictures of the beautiful Icelandic horses

Exploring the volcanic area that is North Iceland

Welcome to the North! Day 6 started out strong with our first included breakfast of the trip. (So long yogurts that have been riding around in the trunk for a day or 2…) HELLOOOO Smörgåsbord!
There were some fruits, various breads, crackers, cold meats and cheeses, yogurts (skyr) with cereal toppings, juices, teas, coffees, and the truly interesting breakfast option of SMOKED TROUT. (good but for me… just not a breakfast food)

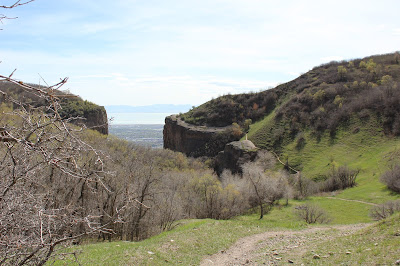
Our first stop of the day: Skútustaðagígar
which was LITERALLY right next to the guesthouse we stayed in… Like we could’ve walked over! The map above shows various great walking paths around the cones with a couple loops (Small and large!) depending on your time. It was cold and raining (typical) so we opted for a shorter loop. 
The Skútustaðagígar pseudocraters were formed when molten lava flowed into Mývatn lake, triggering a series of gas/steam explosions. These dramatic green dimples then came into being when trapped subsurface water boiled and popped, forming small scoria cones and craters.
The cones can be found all around Myvatn lake but the largest collection (and thus easiest to see) are at Skútustaðagígar in the southern region of Myvatn. 
Sheep roam all around the pseudo craters! 
Iceland sheep! 
Loads-a-cones
The parking area and walking paths are FREE to visit and didn’t appear to have any hours posted. There weren’t any toilet facilities in the parking area but there is a gift shop/ cafe across the road from the main parking area that may have facilities. 
The coolest part for me was how the lake was so immense and filled in a bunch of the gaps between the craters. This was definitely a cool and unique landscape that can take you anywhere from 10 minutes for a quick stretch of the legs or a few hours walking the paths on a nice day. 
Next up: Dimmuborgir: A land rich with both cultural and geological oddities! But first the culture and thoughts on this sign above: 
According to Icelandic folklore, Dimmuborgir is the home of a homicidal troll named Grýla, her third husband Leppalúði and their sons The Yule Lads. Though Grýla has psychopathic tendencies, the children aren’t quite so murderous, and are more mischievous than anything. Originally told as a scary story to stop children misbehaving, the Yule Lads have now been merged with the idea of Santa Claus. Children either get gifts or rotten potatoes in their shoes at Christmas depending on whether they’ve behaved well or not.There are 13 Yule Lads in all, each with their own mischievous plans. 
Favorite Yulelads: Doorway-Sniffer (Gáttaþefur), Window-Peeper (Gluggagægir), Sausage-Swiper (Bjúgnakrækir), Door-Slammer (Hurðaskellir), and Spoon-Licker (Þvörusleikir)
Beyond the interesting culture of trolls and yule lads, Dimmuborgir has incredible rock formations that you can’t really see anywhere else! The only other similar land mass known to exist is beneath the sea, off the coast of Mexico. 
The Dimmuborgir area consists of a massive, collapsed lava tube formed by a lava lake flowing in from a large eruption about 2300 years ago. The lava pooled here, over a small lake and as the lava flowed across the wet sod, the water of the marsh started to boil. The vapor rose through the lava forming pillars from drainpipe size up to several meters in diameter.
The Fall colors in the moss and brush made this place seem even more mystical when combined with the fog and rain. 
Braden being sneaky as he came down from inspecting a yule lad cave! 
There are miles of paved walking paths, with many loops and options. In fact, the park is very large making it VERY easy to get lost. We didn’t explore for too long but from where we did walk, we came across at least 4 or 5 intersections of paths. 
*Tip: Take a picture of the trail map at the entrance that way you know where all the various trails (and their names) lead. 
 Language time! Dimmuborgir literally means Dark Castle!
 (dimmu “dark”, borgir “forts”, “castles)
Detail shot of moss growing on a lava pillar.
Let’s not forget to mention a very REAL reason we visited here… 3 words:
Game. Of. Thrones.
While most of the filming scenes look quite different, it’s not because of CGI but because of winter! They primarily filming the wildling camp north of the wall here, and everything is just about covered in snow. 
A Yule lad cave/ lodging? 
 Really cool entrance to the yule lad cave! 
View of he lake and fall colors from the Dimmuborgir parking area. 
Practical information:
Parking is for SURE free
Entrance… We had read that there was a fee if you didn’t purchase a meal at the cafe, however when we got there, the gate was just open with NO signs saying anything like that… so going to say entrance is ALSO FREE
*Though give the cafe a thought as the lamb stew and rye bread (that is actually cooked in local geothermal ovens) have amazing reviews and we would’ve loved to try it… if it wasn’t before 10 AM. haha
There are toilet facilities in addition to the cafe that are 200 ISK (around $2) for entrance. 
As the sign above says, our next stop was a mere 10 minute drive from Dimmuborgir and mostly made it only the list as it was a more recognizable… filming location… 
for Game of Thrones…
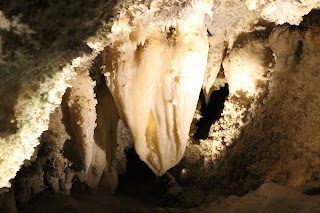
So of you avid fans like myself may recall a scene in season 3 with John Snow north of the wall.. you know what I’m saying… 😉 but Game of Thrones location aside, the cave spring is actually a pretty cool visit. Here’s a blurb about it: In early 18th century the outlaw Jón Markússon lived there and used the cave for bathing and until the 1970s Grjótagjá was a popular bathing site. However during the eruptions from 1975 to 1984, the temperature of the water rose to more than 50 °C (122 °F), and while the temperature is slowly decreasing and has fallen below 50 °C again the cave is owned privately and swimming is still not permitted.
*Note: The nearby lava cave of Stóragjá is supposedly available for swimming but not as hot.. and potentially bacteria infested. Basically I just wouldn’t plan on swimming! haha but they are fun to walk around and check out! 
Beautiful HOT!! water at Grjótagjá cave
From outside the cave parking area you could see the incredible Hverfjall volcano. 
This site was actually on my wish list but as it was cold and rainy and supposedly takes a LONG time to walk the rim (which I believe the thing looked massive!) it wasn’t in the cards for us.
However if you want to plan a trip, the all black volcanic cone DOES look really cool, is less than 10 minutes away from this other spots, and FREE to visit as well. Just know that if you want to walk the rim, it will likely take a while. The diameter of the cone is 1 KM! So the walk around is over 3 km. There are 2 paths up to the top that are steep but should only take 10-15 minutes if you just want to hike up for the view. 
Back over by the Myvatn Nature baths (again a short drive away) lies the Námaskarð geothermal area. The mud pits. 
Again a little Yellowstone like, but this steaming piles of rock that were quite loud were a site to see, and the boardwalk is a fun short venture to walk around. 
All in all another short, FREE, stop. (No facilities here however with the last toilet available being back at Dimmuborgir. 
The sign at the parking area for the geothermal area.
Then it was a slight reroute back East to check out my most anticipated stop in Northern Iceland yet.
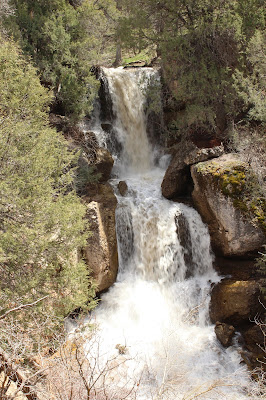
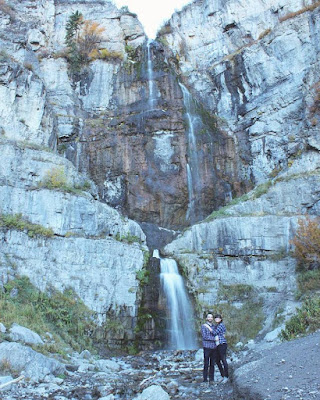
Dettifoss
Europe’s most POWERFUL waterfall. There are 2 access points with 2 completely different views. I had originally gunned for the EAST side as you can get CLOSER to the waterfall and actually SEE the entire thing from top to bottom. However the road is said to be horribly bumpy and on a wet day.. probably not the best idea.
The WEST side however is a smooth easy, paved road with still great views, just expect a 10-15 minute walk from the parking area to the falls vs a short <5 minute walk on the Eastern approach. 
For a better explanation for the pros and cons of each side, I found this post to be VERY helpful. 
Needless to say, the weather really only permitted us to visit the West side… and what a view we had!
lol glad we didn’t torture ourselves with the bumpy scary road out to the East bank when you could hardly see the falls through the mist and clouds! That being said, the falls had quite the roar and were still amazing to see! Just hard to photograph! 
Not to mention FREEZING. There is actually a nice walking path to another set of beautiful falls further up river called Selfoss. (the previous link will give more info on that) as our walk out to the falls and 5 minutes of picture taking left us THOROUGHLY drenched… we hit a new low point and decided against walking out to Selfoss. lol 
Rain clothes and all couldn’t protect you from the heavy wet rain of this day. The water just clung to everything and like I said.. new low. We were ready to get back to the warm car. 
The most clear shot (without mist) I got of the falls.
Dettifoss is actually run off flowing down from Vatnajökull glacier and collects water as it goes from a large area in Northeast Iceland. The falls are 100 m (330 ft) wide and have a drop of 44 m (144 ft).
So with our actual planned items all done for the day early, and with us desperately in want of drier activities… we headed into a whaling town for some unplanned adventure. 
Up next: Húsavík: Whale Watching Capitol of the North
The biggest draw to this sleepy little town are Whale watching tours… which are outside. We happened to want to be INSIDE, so best option? Husavik’s whale museum! While Iceland museums aren’t the cheapest, I would actually consider this a solid museum for someone with medium interest in whales to start with! 
The Whale Museum offers two stories of exhibition area with special attention given to the manner in which information is presented. Exhibits were very creative while also being super informative! Lots of fun whale facts throughout! The lower floor hosts a  main section on marine ecosystems (above photo), and additional exhibits describe the cetacean species in the North Atlantic and their natural history, strandings, whale watching and past/present Icelandic whaling.
The skeleton and incredible tooth of a unicorn whale Narwhal
One of the biggest selling points on this museum for me was the “whale gallery” with authentic skeletons of 9 species. (multiples of some skeletons)
Fun facts: 1.The horn on a Narwhal is actually a tooth that “erupts” in the adolescent years. The whales all have 2 teeth and it us not unheard of for both teeth to erupt forming 2 large tusks.
2. The tooth can grow up to 10 feet long!
3. It is the only STRAIGHT tusk known, and ONLY spirals to the left.
4. It’s tooth is incredibly FLEXIBLE and can bend up to 1 foot without breaking.
5. Only males and about 15% of females tooth erupts into a tusk.

A smaller whale skeleton
Braden admiring a sperm whale skeleton. 
Each skeleton has information about the type of whale and how/ when the museum acquired it. 
Looking down the whale gallery
At the end is a small seal skeleton as well! 
The real crowning glory of the museum: a skeleton of the LARGEST animal to EVER live: The 
BLUE WHALE
The skeleton at this museum is almost the length of the main gallery! There are many photos and plaques explaining where they found the carcass and how they managed to move it. 
Click Here to see photos and read a bit about it. It’s also interesting to note that Iceland is one of the few places in the world you can actually SEE this incredible animals. 
Me standing next to and being dwarfed by just the head!
Blue whale fun facts:
1. Blue whales belong to the Baleen family of whales which get their names from how many “Baleen” plates (sort of their teeth) are in their mouth.
2. They can hold their breath for 20 min or longer.
3. They eat up to 5 tons of krill per day. 
4. They do not reach full size until about 50 years of age.
5. Blue whales sleep while swimming and only with one half of their brain at a time.
6. They can range up to 110 feet long (33 meters) in size making them larger even than the largest dinosaur that ever existed. They can weigh up to 200 tons (181,437 kilograms).
7. Their mouths, when fully open, can take in approximately 90 tons 
8. Their tongues alone can weigh as much as an average adult elephant.
9. Both the blowhole and the arteries of the blue whale are large enough to fit a baby through.
10. Baby blue whales weigh approximately four tons at birth or the equivalent of two large cars. They then grow at a rate of about 200 pounds per day.
And of course, our other favorite aspect of this museum: The Whales, Books, and Coffee nook! They had a range of books about whales and even a small child play area. The coffee was a wonderful way to warm up and sit down at the beginning of our museum tour. (Of course I read the section about Narwhals! in the book pictured below) 
Free coffee and some books about whales to enjoy! 
And the last picture from the museum, a whale carved into a WHALE JAWBONE. 
Húsavík Whale Museum Practical Information:
Hours: June, July, August:08:30–18:30 daily
May and September 9:00–18:00 daily
October:10–16 daily
November–April:10–16 weekdays
Cost: Adults:ISK 1900
Adults(with whale watching discount):ISK1500
Children:ISK 500 
Seniors, students, or disabled:ISK 1500 
Family price (2 adults, 1-5 children):ISK 4000
After some time in the museum we walked around the pier for a bit and witnessed a small group come back from a whaling tour. (They looked SO miserable… 1 person actually was limping off with help and looked near frozen to death) Needless to say, we were pleased enough with our whale experience in the museum. haha
Besides whales, Húsavík actually has another claim to fame as it was the first place in Iceland to be settled by a Norse man. The Swedish Viking Garðar Svavarsson stayed there for one winter around 870 A.D. When he left the island in spring of 870, he left behind a man named Nattfari and two slaves, a man and a woman, and they established a farm here. The name of the town means “bay of houses”, probably referring to Garðar’s homestead, which may have been the only houses then in Iceland.
After walking around the harbor, we had a travelling lunch. We grabbed some fish soup and dessert at a recommended location in town, but after spotting this joint on our walk around the harbor, our hearts called for Fish and chips. So we headed back and I can’t recommend this spot MORE! It was FABULOUS, FAST, and AFFORDABLE. For $16 we got enough fish and chips to easily split between the two of us and if you wanted you could add more fish or chips a la cart. It had restrooms and a small eating area upstairs. 
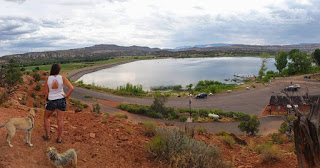
View out of 1 of our windows at Kidagil Guesthouse 
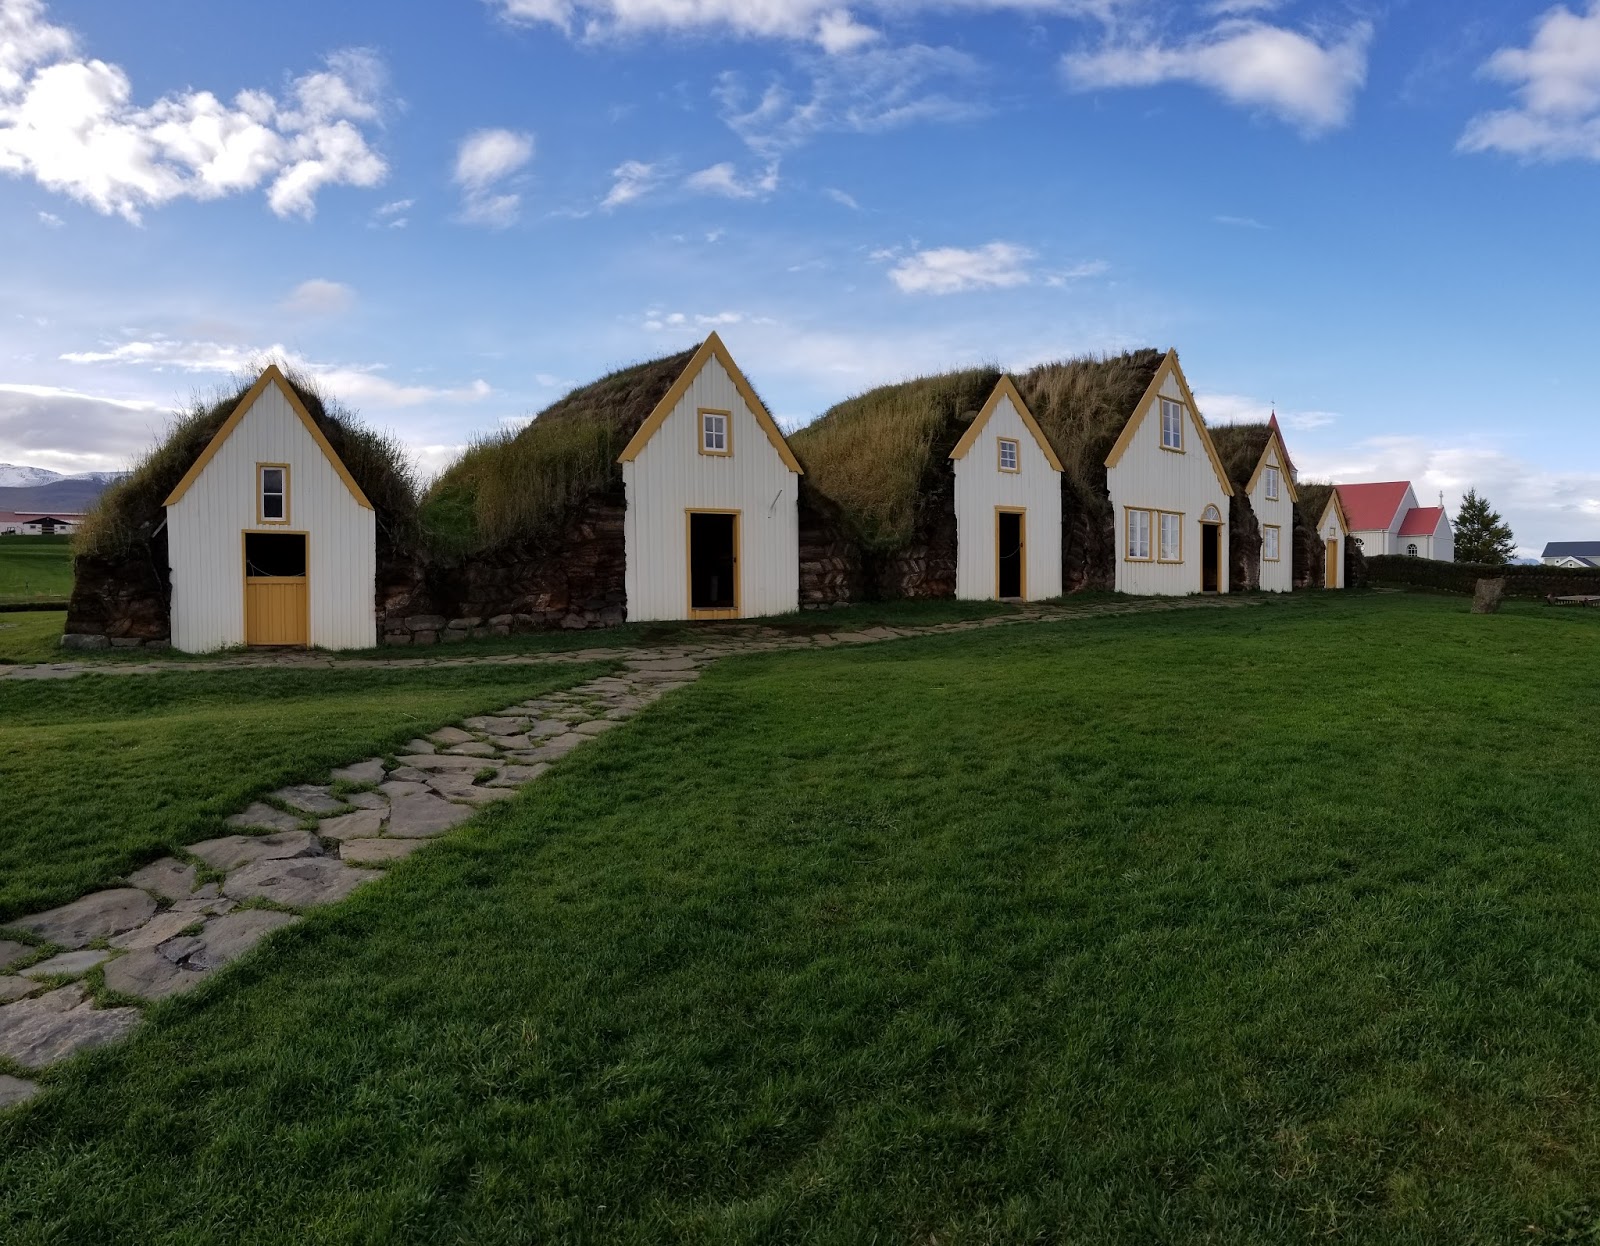
After the excitement of Husavik, we headed to our stop for the night quite a bit off the beaten track of the ring road but one of the cheapest nights of our trip! Kidagil Guesthouse was HUGE and the best part was we were the ONLY guests that night. haha and it happened to be a night all 4 of us bunked in the same room. Hilarious! It was originally built as a boarding school and still in a way felt like a museum. There were lots of informational banners about Icelandic outlaws living off the land and even a few “artifacts.” Loads of fun! Anyways we drank lots of tea and had a relaxing evening inside.. and DRY. Solid day DESPITE the weather. 
Total Car driving distance and time: 230 km and around 3 hr. 15 min
Day 6 Costs:
Rental Car breakdown for 1 day/2 people: $66
Gas breakdown average/ day for 2 people: $18/ day
Breakfast- wonderfully included in hotel 
Husavik Whaling museum $28.20 (with student discounts for 2 people)
Fish Soup and Date cake at Naustiq for around $30 
Fish n chips $16.00
Kidagil Guesthouse: $220/ 4 people so $110 for Braden and I
Day 6 Total Cost: $268 for 2 people

Driving from Höfn to Mývatn – fjords and blue lagoons

Day 5: Our longest and SCARIEST drive of the trip: Höfn to Mývatn. We knew the weather was going to be crummy… but we didn’t realize just HOW crummy it would be. We headed N following the ring road around some of the Eastern fjords where the waterfalls continued to be a plenty but the road was beginning to wash out. A couple times the drain from the falls on the inland side of the road was overflowing the road and on the right was a drop off into the ocean.

See that folks? The most waterfalls in a picture you could get and the whole road was like this on BOTH sides for a while.. and our rental car was NOT insured for river crossings! haha
So when google maps had us turn off the ring road onto national road 939, I thought we’d be avoiding the bad parts. (especially considering how the road was flooded already for much of our drive) 
To give you an idea, if you take this road 939, it saves you 60 km of driving at around 45 minutes…. in good weather.
As it turns out… Rd 939 also referred to as Öxi, is a mountain road that is VERY dangerous in severe weather conditions and outside of the summer season due to icy road, steep grades (sections up to 17% grade), and many MANY blind corners on a narrow road. To put this in persective, the Going to the Sun Road in Glaicer NP is averaged at 5.7% grade and it’s PAVED! We found out the hard way. As we headed up this “shortcut” of the ring road visibility was very low as a cloud sat right on top of the mountain making the blind corners even more BLIND. We even passed one car that was stopped although we didn’t see anyone in it. Finally the 18.5 km of DEATH dirt road was at an end and we saw pavement ahead! 
We stopped for some groceries at a rather large and nice Bonus in Egilsstaðir before heading onto our main event of the day: 
Seyðisfjörður
As we didn’t have a ton of time to explore the Eastern fjords, we figured we better at least check out one and Seyðisfjörður was said to be one of the best. After our trek out there, I’m a believer! It is only 17 miles (27km) off the ring road and a pretty cool drive right over a mountain pass. (thankfully paved this time!) This town is well known as being one of the larger towns with a ferry port, booming (for the area) art scene, and well… the nature! 
The town has viking connections that date back to the 8th century with the first known settler: Bjólfur. The main town was started in 1848 and was the site of the first world’s first industrialized whaling station. In 1906, the first telegraph cable connecting Iceland to Europe was also located here making it a crucial town for international communications. 
Today, this town has the only 2 cinemas in Eastern Iceland, an arts centre, a Technical Museum and local heritage museum, not too mention the adorable cafes and older hotels. It’s also the site of the ferry terminal for the Smyril line connection Iceland to the Faroe Islands and Denmark. 
While we were disappointed the weather was keeping us from the amazing hiking trails in the area, it couldn’t stop us from enjoying the rainbow brick road and warming up in a cafe. 
Views of the rainy fjord out the cafe window 
For some seriously good coffee and the most AMAZING date cake with homemade whipped cream, check out hotel Aldan while in the area! Seriously worth the Iceland prices, it was SO good. 
Also fun fact: Hotel Aldan and the road that takes you from Egilsstaðir to here was used in the long-board scene in the Secret Life of Walter Mitty. 
(not my photo)
I had somewhat had my heart set on hiking MT. BJÓLFUR one of the 7 peaks around the town and with an incredible view looking down the fjord. It was hard to get any information about this hike online however, with some sites saying it was a quick hike while others making it seem larger. There is a visitor center at the port in town where you can ask about trails and when we did… we were told it was 2ish hours each way of hiking! Yikes. Would be worth it on a beautiful day but we weren’t blessed with good weather so we missed out on some incredible hiking. 
Instead we went to the best view of the town we could drive to at the monument to Þorbjörn Arnoddsson. Considering the view we had here, we ruled out the hike even more. haha 
The clouds were so thick and the wind was so strong, it was hard to even pose for a picture. Needless to say, the stop at the monument was short lived. haha 
 So as we didn’t get to hike, we ended up having plenty of evening left as we drove into Mývatn, so we figured… may as well cross something off the next day’s list. Solution: Mývatn Nature baths. 
 Said to be the little blue lagoon, reviews were all amazing for this spot in northern Iceland… well here’s MY review: The cost is outrageous (all the reviewers that said this seemed like a local spot completely blows my mind) while some have said the water is hot, the water was basically luke-warm for us. Occasionally we’d find hot currents but they would disappear and leave you feeling colder than you were before. The changing rooms were a nightmare…. dirty and too small. They instruct you and have signs saying to shower IN THE NUDE yet only have 3 shower stalls that are private meaning no one really listens to the rules and showers in the their swim wear… and occasionally it gets awkward with people actually following the rules. 
 Of course the views were beautiful, and the color of the water very cool… but otherwise I’d say this would be a skipable thing for the price if nothing else. And with that, let’s take a look at those prices:
Mývatn Nature Baths Practical Information:
Hours: Summertime(15 May – 30 September): 09:00 – 24:00 
Wintertime(1 October – 14 May):  12:00 – 22:00 
 Prices: Adult 
3800 ISK (01/01 – 05/14 and 10/01-12/31)
4300 ISK (05/15 – 09/30)
Teenagers, 13-15 years
1200 ISK (01/01 – 05/14 and 10/01-12/31)
1600 ISK (05/15 – 09/30)
Handicapped, Senior citizens, Students
2400 ISK (01/01 – 05/14 and 10/01-12/31)
2700 ISK (05/15 – 09/30)
*Towel rentals are an additional 700 ISK pp. 
 Luckily Braden had his student ID but unluckily… we forgot towels and so had to rent those still so our total cost was right around $80… for an hour of swimming around trying to find warm currents. 
*The one positive was the steam rooms. They had 2 large geothermal steam rooms that were LEGIT hot where we spent the remaining 15 minutes or so of our time trying to regain heat lost. 
 But hey, made for good photos right? Save your money and visit  any one of the MANY swimming pools in Iceland (1 in just about every town) and then you’ll really be swimming like the “locals.” 
 Sign in front of the Nature Baths building. 
 The actual HOT looking blue lagoon was steaming next door.. unfortunately I think this one really is TOO hot. haha but didn’t stop us from walking around and admiring the color. 
Luckily after this stop, our guesthouse for the night was a mere 45 minutes away (short in comparison to the rest of our drive) so we got in, unloaded, and headed to cook our grocery dinner. And lo and surprise! While the place advertised a beautiful kitchen, the one that is supplied was horribly small and lacking equipment… especially considering how many people were trying to use it. It was in this small kitchen, I microwaved our $2 oven pizzas and then fried them into a calzone… Most interesting travel dinner I’ve had yet but hey, only cost $4! 
That being said, location was great and room was comfortable enough, especially considering ours had a private bathroom…. But note: the FAMILY ROOM which we shared had 2 pretty small bunkbeds… that were a little scary with 2 adults sleeping on them but hey, we made do! haha 
Link to where we stayed: Skútustadir Guesthouse
Total driving time: 6 hours, 420 km
Day 5 Costs: 
Breakfast/ lunch: previous groceries

Groceries in Egilsstaðir: $35
Hotel Aldan 2 coffees and Date cake: $16
Myvatn nature baths: $81
Dinner was 2 freezer pizzas for $4 (included in grocery cost but hey we live on the cheap side sometimes!)
Rental Car breakdown for 1 day/2 people: $66
Gas breakdown average/ day for 2 people: $18/ day
Skútustadir Guesthouse: $294 for 4 people so $147 for 2
Total costs for day: $363 for 2 people